Wednesday, July 30, 2008

Do try these at home: some dishes from other food bloggers

What would I do without you, other foodbloggers?? You are a constant source of fantastic inspiration, and here's just a snapshot of dishes I've tried lately.

David Lebovitz's fantastic Fresh Apricot Ice Cream (especially if you've got some lovely French apricots from the market). MattBites kindly provides the recipe. I had no almond extract at home, so used 2 tsp of Amaretto instead. Lovely..

David Lebovitzi aprikoosijäätis

Oh, and while you're at it - his Strawberry Sour Cream Ice Cream is pretty delicious as well (Dagmar has the recipe). I made it quite a few times this summer, and my Estonian friends say the recipe works with bilberries, too:

Maasika-hapukoorejäätis

Elise's Tuscan Scrambled Eggs made a great light supper, and we'll be making it again soon:

Toskaana munahüüve

I really enjoyed Patricia's Crash-Hot Potatoes (see also Wendy's version):

Krõbedad purustatud kartulid

And while we're at it, here are couple of really-really-really tasty dishes Ximena made us when we were visiting her and her husband J. in Madrid in April. First off, Ferrán Adrià´s bag-of-chips tortilla was both genius and tasty:

Ximena kartulikrõpsutortilja

Similarly, Ximena's salmorejo is so worth making with some ripe summer tomatoes:

Salmorejo - Hispaania tomatidipp

And last, but by no means least, my friend Alanna in St Louis makes a great Classic Seven-Layer Salad:


Thank you, everybody!!

Monday, July 28, 2008

pulled pork.

pulledpork

Up until a year or two ago, I had no idea that pulled pork existed. Just the name itself is kind of gross-sounding and weird, almost uh- kind of vulgar, if you know what I mean. When my husband mentioned "pulled pork" sandwiches, my reaction was one of mild disgust. I pictured meat all stretched out on something like a taffy pull. Of course, pulled pork is just a name for really tender pork that can be "pulled" apart. Still, it sounded weird.

Then, he made if for me.

pulledpork2

As I may have mentioned- living in an upstairs apartment with no yard or patio leaves us little room to stretch out, let alone barbecue. When we have pulled pork, we make it in our trusty crock pot. Yes, we broke out the crock pot again, twice in a week! The meat simmers all day (after marinating all night in the fridge) and ends up moist and tender, perfect for little sandwiches. (Or big sandwiches.)

Here's how the hubby puts it together:

For a 2lb pork butt:

In a bowl, combine 1 1/2 cups brown sugar, a few generous pinches of salt, cracked black pepper, some chili powder, some garlic powder, and rub on the pork. Keep it overnight in the fridge letting the rub soak in.

In the morning, throw it in a large crock pot with one large white onion, diced, a few smashed cloves of garlic, and about 2 cups of apple cider vinegar. It smells kind of weird at first, but after the meat gets going, it's amazing. Plan to be out of the house all day or you're going to want to pick at it.

After simmering for many hours (we did ours from about 8 a.m. to 5:30 p.m.), the meat is easily fork-shredded (or pulled, uuugh) into bite-sized pieces.

pulledpork4

I also busted out a big batch of fresh coleslaw. Tonight's dinner is going to feed us lunch tomorrow, and probably a late night snack, too. This morning when Jason was running out the door to work, I was all, "Yo! What do you want me to put in the coleslaw?"

His hurried response was:

"Uh, half a head of green cabbage, about a quarter of the red cabbage- a couple of carrots, some celery, and then a LARGE dollop of mayonnaise, thinned out with some apple cider vinegar and seasoned with salt & pepper."

So, that's exactly what I did. I sliced everything by hand, because I love to chop vegetables, but my husband pointed out he would have been lazy and used the food processor. Oh well! Shred cabbage, carrots, and dice celery (I did 2 carrots and 2 small celery stalks) and toss in a large bowl. In a small bowl, scoop a huge dollop of mayonnaise. (I'm guessing my "dollop" was really more like half a cup, if not a little more. I used the 'serving' spoon that came with our silverware set- not a regular table spoon.) Adding a splash of apple cider vinegar at a time, whisk until the consistency will coat a spoon, but flows freely. Season with salt & pepper, and toss to coat chopped veggies. I couldn't believe how perfect this came out- it was my first time making coleslaw from scratch and I was immensely pleased with the results. I can't wait to have it for lunch tomorrow.

pulledpork3


I felt compelled to edit my post to tell you all about the leftovers I had today. Hella good! Hubby and I each had a sandwich for lunch, and then there was still enough left over for dinner. According to our list (yeah, we do a list, haha) it was "taco night" so I chopped up the rest of a red bell pepper I had in the fridge, half an onion, and sauteed them in a hot pan with some oil, cumin, chili powder, and garlic powder. Then I added the rest of the pork and let it simmer for awhile. Very tasty pork tacos! I love it when my leftovers are actually appetizing the next day.

Sunday, July 27, 2008

Have you ever tried golden raspberries?


They're just as pretty as the 'regular' red ones (I've mentioned yellow ones before). K. took these lovely close-ups for me. (And no, these are not salmonberries or cloudberries).

Friday, July 25, 2008

vegan crumb cake.


I always love a good coffee or crumb cake. It is actually quite a weakness of mine, especially due to the fact that they are widely accepted as a breakfast food (as I have probably mentioned many times, I adore sweets in the morning). I also quite enjoy the process of making them- crumbling up a beautiful topping, or streusel, with my fingers and sprinkling it along the top of a cake batter. I find it almost therapeutic.

I have had many successes in making vegan coffee cakes, since they usually do not require an egg replacer and soy margarine works beautifully as a replacement for the butter that is most frequently used in the topping. The recipe I used yesterday morning comes from Lolo's blog and really makes the ultimate crumb cake. These aren't the teeny puny crumbs I had seen in the past; they are the real deal: sweet, big, and perfect.

Instead of copying the recipe here, I have decided to just link you over to the original post, since Lolo has some great images and details of the crumb-making process that I followed step-by-step. So head over there, bake it, and enjoy this beautiful and delicious crumb cake.


Oven-baked Chicken with Feta Cheese


I'm not doing much cooking these days. It's too hot, I'm not in the mood, and I'm taking it easy on my summer vacation. Of course I do cook - and I've already made quite a few nice jams for the winter - but it's mostly tried-and-tested old favourites of mine, so there's not much to blog about. However, here is one of those old favourites that I do need to tell you about. The recipe is based on this Swedish Arla recipe. I remember making it quite regularly about a decade ago, and was happy to rediscover this dish again. A whole chicken breast with cheese topping is a bit too much for us, so we've split the fillet sideways (?). If you've got a mightier appetite, then feel free to use a whole chicken breast per person and extending the baking time by 10 minutes.

Oven-baked Chicken with Feta Cheese
(Ahjus küpsetatud kanafilee fetaga)
Serves 4

2 large or 4 small chicken breast filets (ca 600 g)
100 g feta cheese, crumbled
200 ml sour cream or creme fraiche or plain yogurt
a pinch of dried oregano
freshly ground black pepper
a pinch of salt

If using large chicken breasts, then cut them into two layers and gently pat and form into filets again (or simply use four small chicken breasts and pat thinner).
Season with pepper and just a little bit of salt. Place into a oiled oven-proof dish.
Mix feta cheese with sour cream, season with oregano. Divide the mixture on top of chicken fillets.
Bake in the middle of 200 C oven for about 30 minutes, until the chicken is cooked through and feta topping is golden.

Serve either with baked potatoes and vegetables, or a light summer salad.

Thursday, July 24, 2008

a strawberry tart with sweet crust.


Since strawberry season is coming to an end, I am trying to use them as much as I can while they are still sweet and inexpensive. I realized yesterday that, although I had talked and talked about making one, I still had yet to make a strawberry tart this season. So, after finding that I had a huge container in our fridge filled with very ripe strawberries, I figured that this would be as great a time as any to make one.

I still had half a jar of the berry jam that needed to be used up soon (freezer jam has a shelf-life of about 3-4 weeks), so I chose to go for a jam & strawberry tart that is made with a crust that tastes just like a huge butter cookie (oh buttery sweets, how do I love thee?). The tart is made with fresh, unbaked strawberries, which is just how I like them. This would make an excellent party or potluck dessert, since it's rather large (8 by 14 inches) and quite beautiful.


(Alice so nicely helped with the crimping)


Sweet Pastry Crust: from Good Housekeeping: Bake It! Cookbook

Ingredients:

3/4 cup butter or margarine (1 1/2 sticks), softened
1/3 cup sugar
1 large egg
2 teaspoons vanilla extract
2 cups all-purpose flour
1/4 teaspoon salt

Directions:

Preheat oven to 400 degrees F.
In a large bowl, with a mixer at low speed, beat butter with sugar until blended. Increase speed to high; beat until light and creamy, occasionally scraping bowl with rubber spatula. Reduce speed to medium; beat in egg and vanilla until blended. At low speed, gradually beat in flour and salt until dough begins to form. With hands, press dough together; shape into a small rectangle.
On large cookie sheet, with floured rolling pin, roll dough into a 14" by 8" rectangle (placing a damn towel under the cookie sheet will help prevent cookie sheet from moving). With fingers, gently crimp edges of rectangle to form a decorative border. With fork, prick crust at 1/2-inch intervals to prevent puffing and shrinking during baking.
Bake until golden, 20 minutes. Cool on cookie sheet on wire rack.


Strawberries and Jam Tart

2/3 cup berry jam of your choice
Sweet Pastry Crust (see above), cooled
About 4 cups of strawberries, each cut lengthwise in half

In a small saucepan, melt jam over medium heat, stirring often. Remove from heat.
Reserve 2 tablespoons of jam mixture; brush remaining mixture over cooled crust. Arrange berries decoratively over jam-glazed crust; drizzle with reserved jam mixture. If not serving right away, refrigerate.

Wednesday, July 23, 2008

crock pot chicken

crock4

There are a lot of awesome things about being married. You get sweet tax breaks, you get to tap your wedding ring loudly on stuff when obnoxious dudes are hitting on you- I mean, there are plenty of perks. Not to mention all the love, and togetherness and blah blah blah- but seriously. When I got married almost 3 years ago, I was 21, living in a sparsely furnished apartment and cooking on some old, totally beat-up frying pans I'd stolen from an Italian place I used to wash dishes at. Then, following the magic of the BRIDAL REGISTRY- we suddenly had a kitchen full of amazing gadgets. For 2 foodies, being newlyweds was like Christmas! We ended up scoring a heavy-duty set of stainless pots & pans, a nice Henckel knife set, good wooden cutting boards, wine glasses, and a nice big crock pot. I had a small crock pot before that I had never, ever used, but we got rid of it when we cleaned up the place one time and I never thought about it until I got the new one. At the time, I was vegetarian and hubby was vegan, and we weren't big soup eaters. I never considered using it for anything but soup until after I started eating meat* and my mom said something about "throwing some chicken in the crock pot for dinner."

What?! You can just PUT CHICKEN IN A CROCK POT? I guess it's kind of a no-brainer, but seriously, I just thought they were for soup. You can put whole cuts of meat in a crock pot and let them slow cook, and believe it or not, it's pretty amazing. We've made pulled pork, slow-roasted chicken, hearty beef stews- whatever. And the best part is the total lack of maintenance.

crock

I promised myself I'd lay off the raw chicken photos, as I've been made aware that they are totally unappetizing. Whatever! The other day, my husband showed me how to break down a chicken and I'm still totally pumped about it. I sliced off the drumsticks, thighs, breasts, and wings. I used the carcass for stock (again. we made it into risotto. mmm.), froze most of it, and saved the thighs and drumsticks for today's meal. I knew my husband was going out of town, so I invited an old buddy of mine over for dinner. This is the absolute easiest chicken dish on the planet, and the flavors are so rich and inviting, it makes you feel like a badass even though it takes less effort than Easy Mac.

crock3

Usually we'd just buy a package of bone-in chicken thighs- or you can buy a whole chicken and use the thighs and drumsticks, saving everything else for other stuff. Bone-in is important for crock pot recipes, the bones keep the meat from drying out.

I am going to admit something slightly embarrassing. I got this recipe from my mom's South Beach cook book. I know, I know. But come on, the classic trifecta of poultry, rosemary, and garlic is just as ubiquitous as tomato, basil, and garlic- right? It's not a hard recipe.

According to the original recipe:

2 lbs (or whatever- I do 1 or 1.5ish) chicken thighs. (I say, BONE-IN!)
3 tbsp olive oil
3 tbsp white wine
1 tbsp dried rosemary, smashed between your fingers
salt & pepper to taste
2 tbsp water
1 lemon
8 cloves of smashed/rough chopped garlic


Place thighs in the bottom of a crock pot. Drizzle with olive oil and white wine, season with salt, pepper, & rosemary. Add rough-chopped garlic. Cook on low for 6 hours.

I served this on a bed of brown rice, with some steamed broccoli. I wasn't feeling very creative with my sides tonight, but there are plenty of amazing side dishes you could make for this.

crock2

Before eating, I pulled out all the bones (the meat just slides right off) and saved for a batch of 'roasted chicken' stock. I wanted to see how different it would be! For one thing, I included mushrooms- and for another, I think I let it go too long! I ended up with more like a demi-glace and less like a broth. That's cool though! I can add it to lots of stuff. It turned a rich, dark brown- but I'm not sure if it's from the bones or from the mushrooms. Oh well!


*A lot of readers asked me to elaborate on why I chose to go back to meat after being vegetarian for most of my adult life. If you're really interested, drop me a line. I'm happy to talk about it, but I don't want to turn my awesome food blog into a weirdo debate about food. I still eat mostly vegetarian and I think that I have a more vegetarian-oriented point of view than most "average American" meat eaters. That said, I respect all points of view and I don't want to berate anyone for their choices. Eat well, homies!

Tuesday, July 22, 2008

glazed apple cookies.


Yet again I am returning to the spicy apple desserts. Even though I absolutely love the summertime, I will be happy when the autumn comes and apples are all around town, just waiting to be plucked and baked. Berries are so gorgeous in desserts, as are other summer fruits, but apples- oh, their taste in sweets is just hard to beat.

The other night, I came across a couple of banged up Granny Smith apples at the bottom of our produce basket, so I thought I would make some apple cookies that I had bookmarked from Allrecipes a little while ago. It was one of those baked goods that completely filled my house with a delightful smell that still lingered the next day, the sweet aroma of apples, nutmeg, cinnamon, and sugar. The cookies themselves are soft and quite cake-like, with a sugary hardened glaze covering the tops. I admittedly ate them for breakfast the following morning with a cup of black tea- perfection.


Glazed Apple Cookies: altered from Allrecipes

Ingredients:

1/2 cup butter, room temperature
1 1/3 cups packed brown sugar
1 egg
2 cups sifted all-purpose flour
1/2 teaspoon baking soda
1/2 teaspoon baking powder
1/2 teaspoon salt
1 teaspoon ground cinnamon
1/2 teaspoon ground cloves
1/4 teaspoon ground nutmeg
1 cup chopped walnuts (optional)
1 cup apples - peeled, cored and finely diced
1 cup raisins (I used golden)
1/4 cup milk
1 1/2 cups sifted confectioners' sugar
1 tablespoon butter
1/2 teaspoon vanilla extract
2 1/2 tablespoons milk

Directions:

Beat butter and brown sugar together until light and fluffy. Beat in egg and blend thoroughly.
Stir together flour, baking soda, baking powder, salt, cinnamon, cloves and nutmeg. Stir half the dry ingredients into creamed mixture. Stir in nuts, apple and raisins, then stir in remaining half of dry ingredients and milk. Mix well.
Drop from tablespoon 1 1/2 inches apart onto lightly greased baking sheet. Bake in a preheated 400 degree oven for 10-12 minutes. Remove cookies to racks and while still warm, spread with glaze.
To make Glaze: Combine powdered sugar, butter, vanilla and enough cream to make glaze of spreading consistency. Beat until smooth. Spread on warm cookies.

sangria.


To me, sangria is the ultimate summertime cocktail. It is ice cold, sweet, and filled with an abundance of fresh fruit. It also makes the perfect party drink, since it can be made ahead of time and in large quantities. While deciding on my menu for a small party I was throwing the other night, I immediately chose sangria as the main beverage. It looked beautiful served in a big glass pitcher with chunks of red-stained fruit (the name "sangria" means bleeding in both Spanish and Portuguese) floating inside.

There are so many different variations of Sangria based on these factors: the fruit used, the color of the wine, if spirits are added, and whether or not it is carbonated. I chose to do my own variation of a recipe I had found on the internet, made mainly with citrus fruits, red wine, and ginger ale (for carbonation). It was quite refreshing and tasty.

Feel free to double or even triple this recipe, depending on the size of your gathering.


Party Sangria

Ingredients:

1 bottle of red wine
1 lemon, cut into wedges
1 orange, cut into wedges
1 lime, cut into wedges
2 tablespoons sugar
A splash of orange juice
1 cup of sliced strawberries or raspberries (may use thawed or frozen)
1 small can of diced pineapples (with juice)
4 cups ginger ale

Directions:

Pour wine in the pitcher and squeeze the juice wedges from the lemon, orange and lime into the wine. Toss in the fruit wedges (leaving out seeds if possible) and pineapple then add sugar and orange juice. Chill overnight.
Add ginger ale, berries and ice just before serving.

(If you'd like to serve right away, use chilled red wine and serve over lots of ice. However, remember that the best Sangrias are chilled around 24 hours in the fridge, allowing the flavors to really marinate into each other.)

Monday, July 21, 2008

a birthday cake.


I have always found it quite sweet and endearing that one of my favorite bloggers, the beautiful and ever-inspiring Andrea of Hula Seventy, bakes a red velvet cake every year on her birthday (you can read more about it here). On Saturday I turned twenty-six years old and since I love baking and wanted a lovely cake for my birthday, I decided it would be nice to follow her tradition and bake my own. Instead of following the recipe she uses, the original Waldorf-Astoria one, I used one from marthastewart.com (mainly just due to the fact that I didn't have shortening on hand). It turned out quite moist with such a nice vanilla/cocoa flavor. And oh, that cream cheese frosting- I could have eaten it with a ladle.


Red Velvet Cake with Cream Cheese Frosting: from marthastewart.com

Ingredients:

3/4 cup unsalted butter, room temperature, plus more for pans
2 1/2 cups cake flour (not self-rising), sifted, plus more for pans
3 tablespoons unsweetened cocoa powder
1 1/2 teaspoons baking powder
2 cups sugar
3 large eggs
1 teaspoon pure vanilla extract
1/4 teaspoon salt
2 one-ounce bottles liquid red food coloring (I only used one and it was still quite red)
3 tablespoons lukewarm water
1 cup buttermilk
1 teaspoon baking soda
1 tablespoon white vinegar
Cream Cheese Frosting for Red Velvet Cake (recipe follows)

Directions:

Preheat oven to 350 degrees F. Butter two 8-by-2-inch round cake pans. Line with parchment paper, and butter again. Dust with flour, and tap out the excess; set aside. In a medium bowl, sift together cake flour, cocoa, and baking powder; set aside.
In the bowl of an electric mixer fitted with the paddle attachment, combine the butter and sugar, and beat on medium speed until light and fluffy, about 15 minutes. Add eggs, one at a time, beating well after each addition. Add vanilla, salt, food coloring, and water; beat, scraping down the sides of the bowl, until well combined. Add reserved dry ingredients in additions, alternating with the buttermilk; beat on low speed until well combined.
In a small bowl, stir together baking soda and vinegar; add to batter. Beat on medium speed for 10 seconds. Be sure not to over beat. Divide batter between prepared pans, and bake until a cake tester inserted into the center comes out clean, 25 to 30 minutes. Remove pans from oven, and transfer to a wire rack to cool, about 15 minutes. Turn cakes out onto rack; let stand until completely cool.
Using a serrated knife, trim tops of cakes so surfaces are level. Place a layer on a cake stand or cardboard round, and spread about 1/3 of the frosting over top. Place the second layer on top, and spread with the remaining frosting over the tops and sides of assembled cake. Transfer to refrigerator, and chill until ready to serve.

For the cream cheese frosting

1/2 cup (1 stick) unsalted butter, room temperature
1 (8-ounce) cream cheese, room temperature
2 cups confectioners' sugar, sifted
1 teaspoon pure vanilla extract

Place butter in bowl of an electric mixer fitted with the paddle attachment, and beat on medium-high speed until light and fluffy, about 2 minutes. Add cream cheese, and beat until well combined and fluffy, about 2 minutes more. Add sugar and vanilla, and beat until combined, about 2 minutes.

Sunday, July 20, 2008

strawberry wacky cake.


Just about five years ago, well before I lived here, I drove up to Portland from southern California to stay with Sharin, one of my closest friends. One of the nights of our stay, her friend decided to bake us something sweet. Since there was a big bunch of delicious strawberries, he chose to alter a recipe he had liked before, a "wacky cake", and change it to one made with fresh berries. I can recall sitting on the porch on that hot summer night and having my friend come out to get me, saying "you better get inside quick, or you're not going to get any cake". When I entered the room, I found six people hovering over a cake pan in the middle of the floor with forks, picking at it to the last crumb like a bunch of vultures. Luckily I was able to get a few bites and goodness, it was scrumptious.

Thankfully the baker of this wonderful cake, Mark, was able to remember what changes he made and was nice enough to email me the recipe a few months later. The other morning I had a bunch of strawberries that needed to be used and low and behold, I decided it was time for this cake.

Wacky cake is traditionally made without milk or eggs, which is why it is believed to have been created as the result of rationing during World War II, when milk and eggs were scarce (thank you Wikipedia!). This one is obviously altered from the original, since it is usually always a chocolate cake. It is extremely moist and not unlike a sponge cake.

Feel free to bake this in whatever pan you like. I think that it works best in a regular round cake pan, but I chose to use mini bundt pans the other day and it worked out fine- Just make sure to alter the baking time accordingly.


Strawberry "Wacky" Cake: altered by Mark Ritter from How It All Vegan

Ingredients:

1 1/2 cups flour
1 teaspoon baking powder
1 teaspoon baking soda
1/2 teaspoon salt
1 cup granulated sugar
1 cup strawberries, mashed to a pulp with a food processor or potato masher (measure after mashed)
1 1/2 teaspoons vanilla extract
1 tablespoon vinegar
5 tablespoons vegetable or canola oil
1 cup cold water

Directions:

Preheat oven to 325 degrees F. Lightly oil a 8" or 9" cake pan.
In a large bowl, stir together the flour, baking powder, baking soda, and salt. In a separate bowl, mix together the sugar, strawberries, vanilla, oil, and water. Add wet mixture to the dry and mix gently.
Pour into cake pan and bake for 45-50 minutes. Test with a knife to see if done.
When cooled either glaze or dust with powdered sugar.

Thursday, July 17, 2008

apricot tartlets.


While grocery shopping last week, a box of beautiful little apricots caught my eye. So I purchased them, put them in a glass bowl and into our refrigerator, and you know what? They sat there. I realized after eating just one that I am not really the biggest fan of fresh apricots- I love them dried or in baked goods, but they are not the kind of fruit I will grab and eat when I want a snack. And so, they sat there, that is until yesterday morning when I decided that instead of letting them just go completely to waste, I would bake something delicious with them. I didn't have enough of them to bake a pie or a full-sized tart, so I chose to make sweet little apricot tartlets.

These tartlets are extremely simple and use few ingredients. The crust is flaky and buttery and the tart filling is so sweet and fruity. Also, if you do not have apricots on hand, I am quite sure that these would be just as good with fresh nectarines or peaches.


Fresh Apricot Tartlets

Ingredients:

For the crust:
1/2 + 1/4 cup all-purpose flour
1/8 cup semolina flour (can substitute all-purpose or whole wheat flour)
1 tablespoon sugar
Pinch of salt
4 1/2 tablespoons cold unsalted butter, cut into small cubes
a few spoonfuls milk
For the filling:
5 tablespoons apricot or peach jam
About 3 fresh apricots, thinly sliced
1 tablespoon unsalted butter, finely diced
poppy seeds

Directions:

For the crust: Combine all the ingredients, except milk, using a pastry blender or two knives to cut the butter, until the mixtures resembles a coarse meal. Add milk, little by little, until the dough forms (the dough shouldn't feel wet). Wrap in plastic wrap, pat it into flat disk, and chill for an hour.

Pre-heat the oven to 375F
Take out the dough, and roll it into 1/8 inch thick. Use a round mould or a big cup to cut the dough. You should get about 5 circles.
Line a baking tray with parchment paper and place the dough circles on it. On each citcle, spread 1 tablepoon of jam, lay the apricot slices in the center, dot with a little butter, and sprinkle will poppy seeds. If desired, fold up the edges
Bake the tartlets for about 25 minutes, until golden.
Eat warm or room temperature. Tartlets will keep for a couple days in the fridge, wrapped in plastic wrap.

pretzel bread (and the tale of an oven).


Yesterday morning I watched quietly as our 1960's stove was rolled out of the house and out of my life for good. I couldn't help but feel a certain amount of sadness as I watched it leave. Sure, it was quite far from being a decent stove- it was always at least 100 degrees hotter inside than it stated, it's burners could not be regulated, and it baked terribly unevenly, but somehow my oven and I had formed some sort of a kinship over the past couple of years. Things were quite shaky when I first moved into our home and began cooking with it- I can still vividly remember the grease fire that almost burned down our entire kitchen- but we soon got into the groove with one another and I learned how to work it with some sort of ease. No one could quite understand how I managed to deal with it and make things come out decently, but somehow I figured it out.

Our time together was finally up though. After years of writing off foods that might be too complicated for my oven (crusty breads, custard pies, and the dreaded souffle), the opportunity arose for me to finally get a real brand new, well-working oven. How could I resist? It was time to part with my old friend move forward with my baking future.

And so, a beautiful new oven sits in its place.

I awoke this morning with a plan: to spend my entire day in the kitchen, baking and cooking to my heart's content. The new oven was just begging to be used and I couldn't wait to try it out. I sat with my laptop and searched through recipes I had been meaning to make. The one that struck me immediately and made my mouth water was a recipe for pretzel bread rolls that I had seen on the ever-inspiring smitten kitchen. To me, there are few things that can be more perfect than pretzel bread. Fresh-baked bread is one of my favorite things in life, but when you take that bread and add a dark hard crust and coarse salt, it becomes exceptional. As I removed them from the oven, I knew that I had made some really, really good. So good, in fact, that I quickly made a second batch and planned our whole dinner around them.

P.S.: Stay tuned for more posts regarding the fruits of my full day of baking labor.


Pretzel Rolls: a recipe from the January 1994 issue of Bon Appetit, adapted by Deb of Smitten Kitchen

Ingredients:

2 3/4 cups bread flour (I used regular all-purpose flour and it worked just fine)
1 envelope quick-rising yeast (or regular active-dry yeast- it will just have to rise a little longer)
1 teaspoon salt
1 teaspoon sugar
1 cup plus 2 tablespoons (about) hot water (125°F to 130°F)
Cornmeal
8 cups water
1/4 cup baking soda
2 tablespoons sugar
1 egg white, beaten to blend (glaze)
Coarse salt

Directions:

Combine bread flour, 1 envelope yeast, 1 teaspoon salt and 1 teaspoon sugar in food processor and blend. With machine running, gradually pour hot water through feed tube, adding enough water to form smooth elastic dough. Process 1 minute to knead. Grease medium bowl. Add dough to bowl, turning to coat. Cover bowl with plastic wrap, then towel; let dough rise in warm draft-free area until doubled in volume, about 35 minutes.

Flour baking sheet, or clear area of counter. Punch dough down and knead on lightly floured surface until smooth. Divide into 8 pieces. Form each dough piece into ball. Place dough balls on prepared surface, flattening each slightly. Using serrated knife, cut X in top center of each dough ball. Cover with towel and let dough balls rise until almost doubled in volume, about 20 minutes.

Preheat oven to 375 degrees F. Grease another baking sheet and sprinkle with cornmeal. Bring 8 cups water to boil in large saucepan. Add baking soda and 2 tablespoons sugar (water will foam up). Add 4 rolls and cook 30 seconds per side. Using slotted spoon, transfer rolls to prepared sheet, arranging X side up. Repeat with remaining rolls.

Brush rolls with egg white glaze. Sprinkle rolls generously with coarse salt. Bake rolls until brown, about 25 minutes. Transfer to racks and cool 10 minutes. Serve rolls warm or room temperature.

Wednesday, July 16, 2008

honey & banana cupcakes.


The other morning I awoke with a strong craving for honey. It wasn't the kind of craving that could be satisfied by just mixing a little bit of honey in my tea, but the kind where I needed an entire food devoted to it. I started off with the plan to make a honey cake filled with bits of dried fruit, but halfway through measuring I realized that I didn't have nearly enough honey as required for the recipe. So, I cleaned everything up again and started anew with a recipe for Honey & Banana Cupcakes from 500 Cupcakes since I had a whole pile of bananas that needed to be used soon. I haven't had the best of luck as far as that cookbook goes, but these turned out quite scrumptious. The bananas contributed to a perfect moistness and the honey brought out that beautiful sweet flavor that only honey can do.


Banana and Honey Cupcakes: adapted from 500 Cupcakes

Ingredients:

1 3/4 cups (about 4) mashed ripe bananas
3/4 cup packed light brown sugar
1/4 cup honey
4 tablespoons margarine or butter, melted
2 cups self-rising flour (if you don't have self-rising flour on hand, you can easily make some yourself)
Pinch of salt

Frosting of choice (I used cinnamon buttercream, but honey, cream cheese, or brown sugar frostings would all work great) or powdered sugar

Directions:

Preheat the oven to 350 degrees F. Line muffin pans with paper liners.
In a large bowl, combine the bananas, sugar, honey, and margarine/butter. Beat with an electric mixer until well blended. Slowly add the flour, baking powder, and salt, and mix well.
Spoon the batter into the cups. Bake for 20 minutes. Remove pans from the oven and cool for 5 minutes. Remove the cupcakes and cool on a rack. When completely cool, frost or sprinkle with powdered sugar.
Store in an airtight container for up to 2 days, or freeze for up to 3 months.

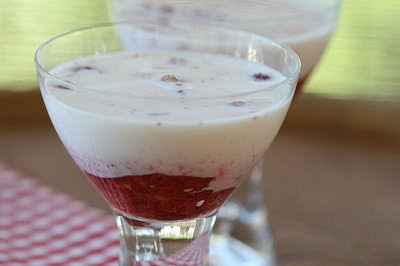
Things to do with wild strawberries: Wild Strawberries and Cream


In every person's life there comes a time when they've got almost 1,5 kilograms freshly picked wild strawberries (Fragaria vesca, see a gorgeous photo by a talented Estonian photographer here) at hand. I'm no different. It happened to me in 2006, in 2007, and again about a fortnight ago. K. and I spent just under 2 hours on our secret wild strawberry field, we barely covered a plot larger than a large kitchen, and we had a 3 litre jar of wild strawberries between us. What can you do??!

Well, one of the easiest things to do (and one of my favourite childhood memories) is following. I've given a 'recipe' below, but you really do not need one. It's healthy, summery, quick, and oh-so-very Estonian (unless you pick 'smultron' in Sweden, or 'ahomansikkoita' in Finland, or 'Walderdbeere' in Germany, or 'fraises des bois' in France, and so on, in which case this dessert would be very Swedish or Finnish or German or French, and so on, of course.)

PS It is especially nice when done with wild strawberries that you've picked yourself. But if that's tricky, then use the ones from a friendly market vendor instead..


Wild strawberries with milk or cream
(Metsmaasikad rõõsa koore või piimaga)
Serves 1

half a cup of wild strawberries
half a cup of single cream or whole milk
2 to 3 tsp sugar

Place the wild strawberries into a glass and sprinkle with sugar. Crush slightly with a wooden spoon.
Pour over milk or cream and eat with a small spoon, stirring as you go.