Saturday, August 30, 2008

oh. my. god. (a 1-year-old's birthday cake.)

Our friends had a birthday party for their lovely daughter today, celebrating her first year. Awesome guys! My son's almost 2, and all I could say after year one was up was, "THANK YOU LORD BABY JESUS- that was tiring." So, congratulations, dudes. Your daughter is a lovely little muffin that I'd love to NOM NOM NOM.

My friend pulled me aside at the party and asked me if I could get a couple of shots of the cake. Of course! I would have done it anyway if she hadn't asked, so this made it less awkward for me to pull out the camera and start shooting. When she steered me inside and pointed it out, my jaw dropped. I was all like, "OH. MY. GAWDDDD! That is the cutest birthday cake I've ever seen!"

So, without further ado, I present to you the world's most adorable birthday cake, ever:

cutestcake

cutestcake2

Unfortunately, my friend's daughter and my nephew share a birthday, so we had to jet from party #1 to party #2 in order to catch all the family action- which means I didn't get to get a shot of my friend's kiddo tearing into her awesome cake. No recipe to share today, just bask in the glory of this adorable little layer cake.

If I sound like I'm gushing, I blame the handful of beers I consumed over the course of the 2 parties, and the delirium I'm suffering after working a full shift at work, then hopping around to 2 different infant's birthday parties. My lord! Now I'm doing the honorable thing and heading to bed. Have a good weekend, everyone!

Oh yeah- I forgot to mention- my friend MADE THIS CAKE! She didn't even buy it! Crazy! Of course, those little adorable lambs and fence posts are not lovingly constructed gumpaste models, they are just plastic cake toppers, but whatever! If she made weird little marzipan guys to top the cake, I'd probably think she was insane anyway.

Friday, August 29, 2008

birthday wishes and a chocolate beet cake.


I would like to say a very happy birthday to my mother all the way down in Los Angeles. She is a remarkable and wonderful woman who I respect and adore dearly. It makes me sad that she lives so far away, although I am quite sure that we will live near one another someday. Since I wasn't able to spend her birthday with her, I decided that I would bake a cake in her honor, a dark chocolate cake made with an abundance of beets. I don't really know when beets started making their appearance in baking, but I have seen them popping up a lot lately. Ever since I saw Bea's Dark Chocolate & Beet Brownies recipe, I have been quite curious about the combination of these two seemingly different flavors.

This cake recipe is one I came up with myself using a combination of many cake recipes I found on the internet. I used fresh beets grated very thinly, resulting in a very moist texture much like a carrot cake. The flavor is deep chocolate, not very sweet, with a sort of rich earthiness which must be the result of the beets. I topped it off with a thin layer of dark chocolate ganache, something I know my mom would truly appreciate.


Dark Chocolate Beet Cake

Ingredients:

2 eggs
1 1/4 cups sugar
1/2 cup vegetable oil
1 cup flour, sifted
1 teaspoon baking powder
3/4 teaspoon baking soda
1/4 teaspoon cinnamon
1 1/2 ounces unsweetened chocolate, melted
1 1/2 teaspoons vanilla
1 1/2 cups shredded fresh beets

Directions:

Preheat oven to 350 degrees F. Grease and flour an 8 or 9-inch cake pan.
Beat eggs, sugar and oil until light and fluffy. In a medium bowl, mix together flour, baking powder, baking soda and cinnamon. Add to egg mixture and thoroughly combine. Add melted chocolate, vanilla, and beets and mix well.
Pour into prepared pan. Bake for 30-35 minutes or until a knife inserted in the center comes out clean.
Cool completely before frosting.

I make my own chocolate ganache from scratch with just measuring equal parts milk, soy milk, or heavy cream with chopped semisweet or dark chocolate. It is a fairly simple process which can be learned about here.

spiced carrot muffins.


I fully admit that I am completely obsessed with muffins. No, not the kind you get at your local coffee shop or god forbid, a convenience store- I'm talking about the soft, warm muffins that are made fresh in the kitchen or inside a great bakery. Thinking about it, I am quite sure that I basically love them all: banana nut, bran, apple, chocolate chip (especially double chocolate chip), maple, blueberry, etcetera. One of my favorites, though, happens to be carrot, perhaps due to my extreme adoration of carrot cake. I don't really know what it is but carrots seem to give off this certain sweetness and flavor that I am completely in love with when mixed with the usual combination of cinnamon, nutmeg, and cloves. Plus, they are known for adding a great amount of moistness. Carrot baked goods are also a great way to use carrots that are starting to get a bit limp (I had some from Saturday's farmers market that had lost all their crunch).

These spiced carrot muffins are the perfect addition to a cozy morning or an afternoon tea. Or really, add a little more sugar to the batter and slather on some cream cheese frosting and you've got yourself a delicious cupcake.


Spiced Carrot Muffins: adapted from Everyday Food Magazine

Ingredients:

1 3/4 cups all-purpose flour
3/4 cup sugar
2 teaspoons pumpkin-pie spice
2 teaspoons baking powder
3/4 teaspoon baking soda
1/2 teaspoon salt
3/4 cup plain or vanilla yogurt
4 tablespoons unsalted butter, melted
1 large egg
2 1/2 cups shredded (about 5 medium) carrots

Directions:

Preheat oven to 375 degrees F.
Line twelve cups of a standard muffin tin with paper liners or grease muffin tin; set aside.
In a large bowl, stir together flour, sugar, pumpkin-pie spice, baking powder, baking soda, and salt; set aside.
In another bowl, whisk together yogurt, butter, and eggs. Make a well in the center of the flour mixture, and add yogurt mixture. Stir until just combined. Fold in carrots.
Spoon batter into prepared muffin cups. Bake muffins until a toothpick inserted in center of one comes out clean, about 20 minutes. Transfer to a rack. Serve warm or at room temperature.

Thursday, August 28, 2008

vegetable stock: an experiment.

junkstock

Some of you might know that since my first beautiful batch of chicken stock, I've gone a little stock crazy. Buying whole chickens has put a big dent in our grocery bill- it's awesome! Instead of spending 8 bucks on organic chicken breasts for one or two meals, we buy a whole bird- split it up into portions for a few different meals that week, freeze some, and make stock out of the rest. I seriously recommend it. Now that we're doing that, we keep stock veggies on hand all the time- carrots, celery, onion, pretty much. Of course, sometimes, the veggies start to get floppy and gross, and if we don't feel like making stock RIGHT THEN- we usually just pitch them. Last time I noticed them losing their sheen, however- I pulled a sneaky move. I tossed them in the freezer to be used later. (My husband doesn't like using odds & ends for stock- he says, "Your stock pot is not a garbage can!" Whatever, dude! You'll thank me when you taste what I made.)

junkstock2

Last time Jason and I hit the farmer's market, we splurged on some local cheeses. Jason picked out a smoked gouda, and I picked out a dill havarti. Both were delicious, but the havarti disappeared in practically no time at all, leaving us with the bacon-y gouda hanging out in the dairy compartment of our fridge. The smoked gouda didn't have a wax rind like regular gouda, just a brown smokey crust around the edges that was too strong to eat. Every time I opened the fridge and smelled it, I'd close my eyes and think- THERE MUST BE SOMETHING I CAN DO WITH THIS.

junkstock3

Today I was poking around and I was suddenly struck with inspiration- a smokey vegetable stock, perfumed with the rind of that delicious cheese! How could I NOT give it a go? I've used parmesan rinds to flavor my stocks with great success, why not throw in some gouda? I chopped up my frozen, wilty vegetables (whatever, Double J!) and liberal amounts of garlic and onion, and got some stock going. I figured I'd let it go for awhile as I pondered the possibilities of adding the gouda. I knew it would immediately melt on contact with the hot water. I didn't have any cheesecloth handy, but eventually it dawned on me- I could just dump out some tea bags and use them like little sachets! I chose the least offensive-smelling tea in my jar, just plain chamomile. After I removed the contents, a slight flowery smell remained, but it was completely overpowered by the smokiness of the gouda, so no big deal. I tied off the ends, dropped it into the stock, and in no time, my house was filled with a rich, heady aroma.

junkstock4

Want a recipe? I didn't really follow one, I just tossed a bunch of stuff in there:

CHOP UP
1 medium to large sized yellow onion
3 carrots (mine were pretty long and skinny)
4 or so celery stalks
a lot of garlic. Like almost a whole head of garlic cloves, just smashed
8 cups of water
3 bay leaves

I preheated my pot to medium-high heat, and tossed in the onions & garlic first. I wasn't paying very close attention and the pan was pretty hot, so the onions ended up getting a little bit of color on them. I think that's part of the reason my stock is so rich and dark- so no complaints. Then I added the (still mostly frozen) celery and carrots, and let it all sweat for a minute or two before I dumped 8 cups of cold water over the top. I dropped in 3 bay leaves, and a teeny pinch of salt. Brought it up to a quick boil, and then turned it down to simmer so that little bubbles came up from the bottom to barely break the surface. I let it go for about 2 hours before I added the gouda sachets, and then let it go for another hour and a half or so, for a total of about 3.5 hours. 8 cups of water reduced to about 3 cups of stock.

junkstock5

Now the fun is trying to decide what to make with it! My first thought was some kind of smokey corn chowder with poblanos and bacon, but now I'm toying with the idea of cheddar beer soup. I think I'll just freeze it and wait for inspiration to strike during the cold months, when I'm craving something thick and rich. And I'd love to try it with other kinds of softer cheeses too, like sharp cheddars or manchego or something. Dang!

pineapple coconut cookies.


So, as I promised before, I decided to bake something that was inspired by my recent vacation to Hawaii. One of my favorite things about going there during the summer is the wonderful fresh food. There are juice and fruit stands all over the islands with bounties of beautiful pineapples, melons, guavas, papayas, and of course, coconuts. Breakfast for me was my favorite part of the day because it usually consisted of macadamia nut pancakes with coconut syrup, guava juice, and a bowl of sweet and delicious tropical fruit. My only complaint was the coffee which to me could not compare to the rich muddy flavor that Portland coffee has to offer. But all in all, my food experience was a great one.

When I was considering what I should make for my island-inspired dessert, I quickly chose to go for the combination of flavors that I identified most with Hawaii: pineapple and coconut. I cannot even tell you how many pina coladas and lava flows I sucked dry during this past trip (and the trip prior), along with enjoying my favorite snack, cut-up pineapple with coconut syrup drizzled on top. So, I was happy to come across a scrumptious-sounding recipe by the great David Lebovitz for pineapple coconut cookies. The cookies came out sweet and chewy, chocked full of that delicious tropical taste.


Pineapple Coconut Cookies: from David Lebovitz

Ingredients:

1 twenty-ounce can of crushed pineapple (in its own juice)
4 cups unsweetened coconut
1 1/4 cups granulated sugar
3 large egg whites
1/2 teaspoons vanilla extract

Directions:

In a large skillet, preferably non-stick, heat the crushed pineapple and it's juice over moderate heat until the liquid has evaporated. Continue to cook, stirring constantly, until the pineapple gets sticky and begins to brown and caramelize. Remove from heat when it's reduced to 2/3 cup.
In a large mixing bowl, stir together the coconut, sugar, egg whites and vanilla extract. Mix in the pineapple. (Batter can be refrigerated at this point for up to one week).

To bake the cookies, preheat the oven to 375 degrees and adjust the oven rack to the center position. On a parchment-paper covered baking sheet (don't skip covering it in parchment paper or you'll have a big mess!), form the dough into 1 1/2-inch tall pointed mounds, squeezing the dough with your fingertips to form little pyramids.
Bake the cookies for 14 minutes or until the cookies are browned up the sides, rotating the baking sheet midway through baking (the tips may burn slightly, which is fine).

Cool the cookies before serving. These are best served the same day they're baked.

Wednesday, August 27, 2008

one-hundredth post : chocolate chip cookie bars.

100th post!photo pulled from the web.

Before writing my recipe this morning, I wanted to note that this is our hundredth post! We started this website back in April as a way to share our extreme love of food and have had so much fun doing it for these past four months (wow, 100 posts in just four months? We've been busy!) And thanks to all of our readers, we have gained a wider audience and been able to communicate with others all around the world, so thank you. We hope you all continue to read about our daily adventures inside (and sometimes outside) the kitchen.


Truthfully, I don't have all that much to say about these chocolate chip cookie bars because really, how wrong can you go with a pan filled entirely with a thick delicious cookie? As I spread the batter into my 9-inch cake pan, I knew this was going to be a flawless dessert. And a dangerous one- the kind of dessert that can easily be finished in one short evening, especially when paired with the inevitable hormone fluctuations of PMS. I got this recipe from the chocolate kings at Ghirardelli who I knew I could trust to deliver a good chocolate confection. And boy, was it ever.


Chocolate Chip Cookie Bars: from Ghirardelli Chocolate

Ingredients:

12 ounces (1 bag) semi-sweet chocolate chips
1 cup butter, softened (2 sticks)
1 1/2 cups brown sugar, packed
2 teaspoons vanilla
2 large eggs
1 1/2 cups all-purpose flour
1 1/2 teaspoons baking powder
1 teaspoon salt
1 cup macadamia nuts, coarsely chopped (optional)

Directions:

Preheat oven to 325 degrees F.
In a large bowl, beat butter with brown sugar at medium speed until light and fluffy. Add vanilla and eggs, one at a time, mixing on low speed until combined. Combine flour, baking powder and salt in small bowl and gradually add to egg mixture while mixing on low speed. Fold in chocolate chips and macadamia nuts, if using. Spread batter evenly into an ungreased 13” x 9” pan.

Bake for 25 to 30 minutes or until wooden pick inserted in center comes out clean. Cool completely in pan on wire rack. Remove from pan and cut into squares.

An Autumnal Fennel and Tomato Gratin Recipe


I am slowly, but surely, warming to fennel. Until now I haven't been a huge fan of aniseedy flavours (and I still passionately dislike liquorice sweets), but I've discovered that fennel can be very tasty after it's been subjected to some heat treatment. Here's an easy autumnal vegetarian fennel and tomato gratin that made an excellent main dish, but would also work as a side dish to pork or lamb, or even some gutsy fish perhaps.

Any other hot fennel recipe ideas I should know about?

Fennel and Tomato Gratin
(Apteegitilli-tomatigratÀÀn)
Adapted from this BBC Good Food recipe
Serves 4


2 large fennel bulbs (about 600 g)
2 Tbsp vegetable oil (I used cold-pressed rapeseed oil)
salt
2 garlic cloves
400 g can chopped tomatoes

Topping:
5 Tbsp dried breadcrumbs
50 g grated Parmesan cheese

Trim the fennel bulbs (remove outer tough layers) and cut into thin wedges. Keep the fronds for garnish!
Heat oil in a saucepan and add fennel. Season with salt, cover and sauté on a low heat for 15 minutes, stirring every now and then.
Add finely chopped garlic and cook for another 10 minutes, covered.
Now add the chopped tomatoes and simmer on a medium heat for 10 minutes, until tomato sauce has thickened. Taste for seasoning.
Pour into a medium-sized ovenproof dish, spreading the mixture evenly. Sprinkle with breadcrumbs and grated cheese.
Bake in a preheated 200 Celsius oven for about 20 minutes, until the gratin is golden on top.
Serve, garnishing with dill-like fennel fronds.

Monday, August 25, 2008

canned peaches- a guest blog.

sanders

Honestly, if you had told me at age 11 that in 13 years, I'd be sitting at a table with Matt Sanders discussing canning methods, I'd think you were insane. To put it mildly, in the 6th grade, we did not get along very well. But- over a decade has elapsed, and through the magic of mutual friends, the internet, and the contained biosphere that is Portland, OR- we have become friends, and chat sometimes on the computer, or occasionally over coffee if we bump into each other at the cafe. Recently, talk has turned to canning. Matt's doing his family a solid by carrying on canning recipes given to him by his grandmother (which is awesome, in my opinion) and today he decided to put up some peaches.

peaches

My mom canned jam frequently when I was little (and still makes freezer jam pretty often), but my involvement was usually limited to trudging up and down the big hill in our backyard with a massive bucket of blackberries, then grumbling about the heat in our muggy kitchen as I washed my scratches off in the sink. I never thought to sit down with her and learn how to do it! (for the umpteenth time- SORRY MOM.)

To the uninitiated, the idea of canning fruit seems kind of scary. Botulism, broken seals, blah blah blah- apparently when it comes to canning fruit, it's not such a big deal. Matt assures me that fruit, when put up improperly, will simply mold or give off a horrific stench- more than enough to let you know that it's not okay to eat.

If this recipe is a little too vague for you (what, has he been hanging out with my husband?):
peaches7

Matt has done me the favor of detailing his process:

Prepare the syrup:
4c water + 1c honey +1c sugar. If you're really feeling it, you can add more honey. get it warm and evenly dissolved, but not boiling, EVAR. You can use heavier syrups, but I like the light kind and it's what my family has always used.

peaches3

Prepare the jars:
Wash the jars. Put the jars in boiling water for 20 minutes. Put the lids and the rings in for a couple minutes. You can reuse rings, but ALWAYS buy new lids, as the seals are only good once. You can use old lids for things like freezer jam, lids on jars for frozen stock, etc., just don't trust them for another complete seal.

peaches2

Prepare the peaches:
If you can, get freestone peaches, as they will come off the pit easier. these are mostly available late in the season...the closer to September, the higher likelihood a peach will be a freestone. Canning peaches need to be just a little overripe, if you've got some bruising, awesome. Don't worry about it. Pretty fruit is overrated. Stick them in some boiling water for a minute give or take. run it under cold water, and the skin will pretty much come off in your hands (except for that one I had to use the knife on). Cut them into halves, slices, chunks, whatever you want. i like halves, but that's only possible with freestones.

peaches4

Cut those bitches and put them into the jars. (Editor's note: Jeez, Matt! My mom reads this! Oh wait, my mom knows that I have a mouth like a sailor. Carry on.)

peaches5

Pour your syrup all over your cut peaches.

Pull out the lids and rings, and while swearing and cursing that your fingers are melting off, place the lids on, and just hand tighten the ring. Just needs to be firm, not wrenched on there or anything. Then, place the jars back into a large pot full of boiling water, and boil for 25 minutes for pint-sized jars, 30 minutes for quarts.

Turn them upside down, and they'll cool faster. Let them sit overnight, and then you can take the rings off. If the lid is bulged or you can press it in, the seal didn't take, and you should just eat them as is. If all goes as planned, you'll have a lid on there and ready to go. Wait a few months before you use them, they do need to set for a while.

peaches6

And that, apparently- is all there is to canning peaches. A few notes about Matt's process- he had a handy little tool for getting the hot jars out of the boiling water- like this. I probably would have tried to use a fork or something stuck inside the jar to get it out, and I probably would have burned myself. I like his idea, better. As with any project, it seems to have gone very smoothly because he had all his ingredients laid out ahead of time, all his pots ready on the stove, etc. Good prep is always key, guys. I have to admit, I'm feeling ambitious. I might give this a try soon! I really like that his syrup has honey in it, it makes me feel like maybe it's a teensy bit healthier. And now I have a craving for peaches spooned over ice cream.

Saturday, August 23, 2008

berry and yogurt popsicles.


As much as I hate to admit it, I can feel the summer getting closer to an end. Halloween decorations are being stocked in stores (way too early in my opinion), cold weather is occurring a bit more often, and pumpkins and apples are appearing around our neighborhood. I love autumn, but I really try to hold onto the warm summer days for as long as I can and enjoy soaking them up to their fullest. This usually includes partaking in warm weather treats like ice cream, lemonade, and most importantly, popsicles. I find them to be the perfect summertime treat: fruity, refreshing, and not heavy, something you can easily devour two to three times a day.

I admit, I really love the cheap and overly-sweet popsicles that come from the grocery stores and ice cream trucks (anyone care for these?), but I find the ingredients to not be the healthiest choices for my kids. So this time I decided to purchase a fabulous frozen treat mold and make my own healthy popsicles out of yogurt, berries, and honey. And the result? Perfect sweet summer goodness. And as you might be able to tell, the kids loved them.

Note: Please feel free to change this recipe as much as you'd like. You can use any kind of yogurt, sweetener, and/or fruit that you like.


Yogurt & Berry Popsicles (So simple!)

Ingredients:

2 cups plain or fruit yogurt (I used a combination of Greek and strawberry)
2 cups fresh or frozen berries
1-3 tablespoons honey, depending on how sweet you'd like them

Directions:

Put all ingredients in the blender. Blend until very smooth. Pour into popsicle molds or small paper cups (if you do this, make sure you add the sticks after the pops have froze a bit). Freeze for 6 or more hours.

Thursday, August 21, 2008

power bars.


And so, I have returned from a wonderful vacation to Kauai. My time there was spent lazying around in the sunshine, jumping into rivers, spending time with family, and most of all, eating and drinking fabulous foods and fruity cocktails. But for now, I won't be getting into that- be on the lookout for a Hawaii-themed post in the near future. Just know, I am back.

Before I left on our vacation, I was trying not to eat overly fatty (getting bloated before having to wear a bathing suit wasn't really something I wanted), so I decided to make something out of Heidi's health-conscious cookbook, Super Natural Cooking. Her recipes always sound absolutely delicious and very rarely ever use the general "bad" ingredients (white flour, refined sugars, etc.). I chose to go for her Power Bars recipe, since they seemed like the perfect healthy snack food- plus, it was something I could throw in our carry-on bag for the plane ride.

The end result was quite good. They were healthy-tasting, but in the good way- fruity, nutty, and not unnaturally sweet. I loved their chewy texture and how nicely they cut into small bars. Alice even wrapped them in little wax paper packages which made them even easier to grab on the go.


Do-It-Yourself Power Bars: from Super Natural Cooking

Ingredients:

1 tablespoon coconut oil
1 1/4 cups rolled oats
1 1/4 cups chopped toasted walnuts
1/2 cup oat bran
1 1/2 cups unsweetened brown rice cereal (crisp, not puffed)
1 cup dried cranberries, coarsely chopped
3 tablespoons finely chopped crystallized ginger
1 cup brown rice syrup
1/4 cup natural cane sugar
1 teaspoon pure vanilla extract
1/2 teaspoon fine-grain sea salt

Directions:

Grease a pan with the coconut oil. If you like thick power bars, opt for an 8 by 8-inch pan; for thinner bars, use a 9 by 13-inch pan.

Mix the oats, walnuts, oat bran, cereal, cranberries, and ginger together in a large bowl and set aside. Combine the rice syrup, sugar, vanilla, and salt in a small saucepan over medium heat and stir constantly as it comes to a boil and thickens just a bit, about 4 minutes. Pour over the oat mixture and stir until the syrup is evenly incorporated.
Spread into the prepared pan and cool to room temperature before cutting into whatever size bars you desire.

Watermelon with Orange and Mint


Delicious, juicy, refreshing, just enough different, effortless, quick.

Thank you, Maryam and Barbara !!

(Arbuusisalat apelsini ja mĂŒndiga)

Monday, August 18, 2008

A lovely aubergine curry with tomatoes, coriander and nigella seeds as part of an Indian meal


Last weekend I cooked an Indian meal. I don't know if my favourite Indian food bloggers Meeta and Nupur approve, but the meal felt definitely Indian enough for us two :) It wasn't an elaborate feast - I baked some naan-breads and sprinkled them with nigella seeds, made an aromatic chicken curry, roasted some broccoli with garam masala, and prepared a really flavoursome aubergine curry (that's eggplant curry in American English) with tomatoes, coriander and nigella seeds. The latter was the big hit of the night - plenty of flavour and character, beautiful vibrant colours, and not too many calories. The recipe is very slightly adapted from the August 2008 issue of BBC Olive Magazine, and I will definitely make it again if I want a nice vegetarian aubergine dish.

Aubergine curry with tomatoes & coriander
(VĂŒrtsikas pommuhautis tomati ja koriandriga)
Serves 4


1 onion, chopped
oil
1 large or 2 smaller aubergines/eggplants, cut into 1 cm slices
1 tsp turmeric
1 tsp cumin seeds
1 tsp nigella seeds
400 grams tomatoes, coarsely chopped
a handful of coriander leaves/cilantro

naan bread and plain yogurt to serve

Fry the onion in some olive oil on a non-stick frying pan for about 7-8 minutes until soft, then tip into a heavy-based saucepan.
Add a little more oil to the frying pan. Add aubergine/eggplant slices and fry until they are browned on each side (you may need to work in batches). This requires patience and cold nerves! Aubergine soaks up all the oil it can get, so don't add more than a little oil at the time - just enough to barely cover the pan. The slices will soften and brown eventually, and even without adding more oil. Trust me!
Add the spices to the onions in the saucepan and fry for about 30 seconds to release the aromas.
Add chopped tomatoes and cook on a moderate heat for about 5 minutes, until the tomatoes soften.
Now add the browned aubergine/eggplant slices and heat through.
Scatter coriander/cilantro leaves on top and serve.

Other recipes with Indian twist on Nami-nami:
Brinjal Masala aka deep-fried baby aubergines (October 2005)
Chicken Korma (October 2005)
Gobi Matar aka Cauliflower & Peas with Cumin (October 2005)
Potatoes & Beetroot Greens with Indian Spices (August 2007)
Smoked cod kedgeree (April 2007)
Strawberry Shrikhand or spiced yogurt with strawberries (October 2005)

Pretzel bread sandwiches.

pretzelsammy3

The first time I walked into little t, I knew. I sat down with my bowl of granola, yogurt and berries, sipped my complimentary cucumber water, and gazed into the bread case with PLANS. little t is a new bakery in SE Portland, a few miles away from my apartment, and it might be one of my new favorite places. But it was really true love the first time I noticed the compact loaves of pretzel bread sitting in the case. Let's face it- I could make my own pretzel bread, but a quick glance in the cupboard showed that I didn't have any flour, coarse salt, or even cornmeal for dusting. Boo! Besides, the idea I had stirring gave me an excuse to walk to little t and enjoy the lovely rain we were finally blessed with, after a scorching weekend.

pretzelsammy

Yesterday morning, we stopped into little t for breakfast and I saw on the menu that they actually have a ham & cheese on pretzel sandwich, so I had one, and it was amazing. Those huge hunks of coarse salt- dear lord. But that didn't deter me from my plan- it only strengthened my craving. What I really, really wanted- pastrami- they didn't have at the New Seasons deli, so I stuck with ham. Jason wanted ham anyway. I walked the almost 4 mile round-trip hike to the bakery, picked up my pretzel breads, stopped at the market for meat, and when I got home, I practically counted the seconds until dinner time.

pretzelsammy2

And so, I did it. I made what I wanted, and it was the bomb: Ham & Swiss on pretzel bread, with mayonnaise, stone ground mustard, and just a little bit of sauerkraut. Hubby wanted his sandwich cold, but I opted for open-faced melt. Right now I'm staring at the last (I got an extra) pretzel loaf sitting on the board on my stove, thinking- should I? Should I warm it up and dip it in some mustard, or just tear into it the way it is? Probably not, but it's not like it'll keep overnight. The moisture in the bread will slowly destroy the salt crystals, which will in turn pucker and harden the crust. No, I think I'll have to take care of this leftover loaf myself.

pretzelsammy4

The only thing that could be more perfect than a ham & swiss on pretzel- is the fat sausage that I'm going to stuff one with next week. Hey vegetarians: I'm sorry I don't have anything to offer you. If you can find a vegetarian filling for a pretzel sandwich that tops cured meat, aged cheese, and pickled vegetables- do drop me a line. I'd love to hear all about it.

Sunday, August 17, 2008

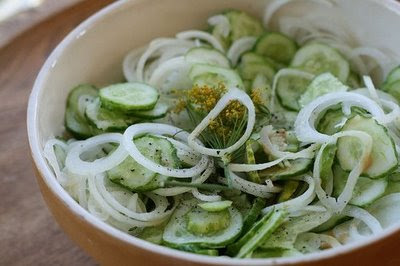
Pickled Sliced Cucumber Salad Recipe


I've given you so many sweet recipes recently that it's definitely time to share a lovely savoury recipe instead.

Here's a quick pickled cucumber salad that would keep nicely a week or so in your fridge. It's gutsy, has got lots of flavor and crunch, and tastes lovely. I nibbled on it straight from a bowl, but it would make a nice side salad to some grilled meat as well.

The only downside is that you only get about two 500 ml jars out of this amount. If you give one to your mum or a dear friend, then you're just left with one jar yourself, which is no way enough ... For best result, use small crisp cucumbers and not the long supermarket ones.

Pickled Sliced Cucumber Salad
(Marineeritud kurgisalat)

1 kg small crisp cucumbers
2 large onions
1 garlic clove, finely chopped
1 Tbsp sugar
1 Tbsp sea salt
1 Tbsp vinegar (30%)
freshly ground black pepper
1 tsp Dijon or Estonian mustard
1 to 2 large dried dill "blossoms" (ask from the market)

Slice the cucumber and onions into thin slices - I used my kitchen mandoline. Mix all ingredients in a large bowl, then cover with cling film and leave to stand at room temperature (that's 18-20 C) for about 5 hours.
Shake the bowl or mix the salad couple of times, so the seasonings would distribute evenly.
Divide into sterilised jars and close the jars (there should be enough liquid now to cover the cucumber slices).
Keeps for a week or two in the fridge.

Friday, August 15, 2008

Another apology.

Summer's still in Hawaii, and I'm here in Oregon where it is BLAZING EFFIN' HOT, Y'ALL. I think it was like 104 today, or something like that. Needless to say, I haven't been cooking much at all, and salads don't make particularly interesting blog fodder. It's funny, because I sure did a lot of complaining when the weather was rainy, and now I'm melting. Oregonians really do love complaining about the weather, haha! Luckily, starting Monday, it's supposed to get nice and cool.

Please accept these photos of my friends Ed & Christie's kitchen:

maters

sill

Hope everyone is staying hydrated. :)

Thursday, August 14, 2008

Raspberry and Coconut Crumble Recipe


Another neat raspberry idea, this time a light and coconut-scented crumble. We loved this with lightly whipped cream, and finished it in no time at all. The recipe is adapted from a Swedish food magazine Allt om Mat (12/2008) and serves 6.

Raspberry and Coconut Crumble
(Vaarika-kookosevorm)

300 to 500 g fresh or frozen raspberries
3-4 Tbsp sugar
1 tsp potato starch/potato flour

Crumble topping:
150 g butter
200 g coconut flakes (unsweetened)
100 ml (less than half a cup) caster sugar
100 ml (less than half a cup) plain/all-purpose flour

To serve:
whipped cream (season with vanilla, if you like)

Gently mix raspberries with sugar and potato flour and scatter on a buttered pie dish.
Melt the butter, stir in coconut flakes, sugar and flour. Crumble the mixture on top of raspberries.

Bake in the middle of a pre-heated 180 Centigrade oven for 15-20 minutes, until the coconut crumble is light golden brown.

Serve warm or cold with some whipped cream.

Tuesday, August 12, 2008

Why so quiet?

Summer just went to Hawaii with her family, so blog posts may slow down a little. (In case you haven't noticed, things have been sparse the last few days as she prepared for her trip.)

I've got a few dishes planned for this week, but all the ooey-gooey baked goods are going to have to wait until Summer returns, since I'm kind of a dunce when it comes to baking. (And I'm kind of on a diet. Kind of.)

Chocolate Brownie with Raspberries


How many chocoholics are out there? Hands up, please!? Well, I thought as much. If you like chocolate as much as I do, here's a recipe for you. It's adapted from Sue Lawrence's lovely cookbook "Sue Lawrence's Scottish Kitchen: Over 100 Modern Recipes Using Traditional Ingredients" (UK link/US link), but I've reduced the sugar content by one-fifth with no ill-effect to the texture, but your hips - and tastebuds - will thank you for that, trust me. You'll get a moist and flavoursome chocolate brownie with sweet-tart raspberry spots throughout.

Raspberries are one fruit/berry that really thrive in the cool and humid Scottish climate, so various raspberry desserts abound in Scottish cookbooks (think of cranachan, the traditional Scottish oat-raspberry-whisky concoction; more recent and prettier picture here). Luckily, raspberries also love Estonian climate - and my mum's garden - so I can easily access these lovely sweet-tart berries here.

My dear K. thought these were too chocolatey (what's that???), but my friends all helped themselves to a (large) second piece :)

Chocolate Brownies with Raspberries
(Ć okolaadiruudud vaarikatega)
Makes 16 squares

350 g dark chocolate (55-60%), broken into pieces
250 g unsalted butter, cut into cubes
3 large eggs
200 g soft dark brown sugar (muscovado)
100 g plain/all-purpose flour, sifted
1 tsp baking powder
a pinch of salt
300 g raspberries (can be frozen, do not de-freeze!)

Place chocolate and butter in a small heavy-based saucepan and heat over a low heat, stirring occasionally, until almost melted. Remove from the heat when just small pieces of chocolate remain (the chocolate will continue softening) - take care not to burn the chocolate! Cool a little.
Whisk the eggs until thick and pale foam forms, then add sugar in three batches, still whisking. Fold into the cooled chocolate-butter mixture, then stir in the flour, baking powder and salt.
Butter a 23 cm square brownie pan.
Spread half of the chocolate batter into the pan, then scatter raspberries over and top with the rest of the batter.
Bake in a preheated 170 C oven for about 40 minutes, until the cake looks baked on top. Test for doneness with a wooden toothpick - the brownie cake is done, when the toothpick remains just a little bit moist.
Remove from the oven and cool on a metal rack for about 20 minutes.
Cut into squares (4x4 seems to work well, considering the intense chocolate flavour), but let cool completely in the cake pan before removing.

Other brownie posts on Nami-nami:
Chocolate Brownies with Walnuts Recipe (January 2008)

Sunday, August 10, 2008

Miss Delta, a restaurant review.

missdelta

I've been looking forward to my husband's birthday for a few weeks now. I saved my tips from the last few weekends of working so that I could treat him to a whole day of goodies- just a payback for all the sweet birthdays he's hooked me up with over the years. Last year he bought me a tattoo! After a morning at the farmer's market (picked up some small eggplants that you'll see later this week!), an afternoon of asparagus & chevre pizza slices at Hot Lips, dropping off our son at the grandparents' house for an overnight stay, and snacking on fancy cheeses we picked up at the market (dill havarti and smoked gouda, mm)- the time came to decide on dinner. I'd been kind of hounding the husband for the last few days- excited about what restaurant he might choose. Since I'd purposely saved up some cash, we weren't particularly worried about spending, so I had visions of fancy dishes floating around in my head. But, when it came down to it, he just wasn't in the mood for fancy. And it turns out- neither was I.

missdelta2

I've lived in the Portland area my whole life, but I've never eaten at the original Delta Cafe on SE Woodstock- not even now that I work only a few blocks away! One night, my husband and I had a craving for delicious food, so we decided to try it out- but the restaurant had closed only a few moments before, and even though we could have ordered food at the bar, it was standing room only. Boo! So, we forgot about it for awhile, until the owner of the Woodstock Delta Cafe sold the restaurant and moved across town to open Miss Delta- a similar cafe on N. Mississippi Ave.

I spent the whole week leading up to birthday dinner DESPERATELY CRAVING a giant cut of meat. I don't know, maybe it was a hormone thing, whatever. I just knew that wherever we went, some kind of loin or flank or tenderwhatever was in my future. So when my husband mentioned Miss Delta, it was like everything fell into place. DUH!

All my buddies have been raving about Slow Bar's "Slow Burger"- supposedly the best burger to grace mankind since- well, ever. It's made with Strawberry Mountain beef, which is a local farm that I don't know a lot about, other than it appeals to foodies. I believe it's grassfed, organic beef. You know, the hippie stuff. So- when I saw a Strawberry Mountain flank steak on the menu at Miss Delta last night, my little heart sang out "YES! Give us some protein!"

missdelta3

I tried to avoid the full-on MEAT SHOT since I know it's not very appealing to some of our readers, but you can see in the upper right area of the shot, my medium-rare (well, it was pretty rare. which I like.) flank steak, sitting pretty next to a ridiculously huge mound of mashed potatoes. DELICIOUS mashed potatoes, I mean. Listen, posting this is just kind of making me drool, it's kind of bumming me out. I want to re-eat this dinner SO BAD. The steak was charred as hell on the outside but tender and pink on the inside- and I don't know if they brined it with something fancy or if I was just psyching myself out with crazy expectations or what, but I honestly have never tasted beef this phenomenal in my life. I know that Strawberry Mountain isn't exactly "top tier" like UBER FANCY BEEF, but it's certainly higher quality than what you'd get at your average grocery store. I was practically weeping as I ate- a common reaction to delicious foods. You could say it gave me a culinary boner, to quote Summer's awesome Top Chef t-shirt.

missdelta4

Jason went for the gumbo, which we lovingly described as the Ultimate Salt & Brown® - a silly inside joke. Recently we ate at a horrific chain restaurant which shall remain nameless- let's call it Crackaroni Shill. I'm not going to defend it- I'll just say that we were at the mall on an unrelated errand and we were STARVING, so we went there, and it was so god-awful I wish I could go back in time and un-eat it. The food was terrible, but it spurred a conversation about beloved childhood foods, many of which were basically packets of msg and sodium and weird powdered cheese or beef stock or something- mixed water and spooned over meat. One of my favorite dishes when I was a kid was something my mom just called "Chicken and Noodles." It was a huge bowl of egg noodles, topped with a couple of roasted chicken breasts, and ladled over with a massive amount of this bizarre yellow gravy- it was just a packet gravy from the 'packet aisle' of the grocery store. They don't make it anymore, I guess- which is a shame, I adored it. Anyway, we joked about how all of our favorite flavors from our childhoods can be described simply as Salt & Brown. Salisbury Steak, brown gravy, etc.- Just salt and "brown." So anyway, this gumbo did Salt & Brown with flair, and I'm guessing it's marginally healthier than the shit you get from a packet.

If you're in the Portland area, and you're tired of heading to Montage for your late-night cajun fix, hit Miss Delta, because oh my damn- do you need a steak? Yes, you need a steak. And some Salt & Brown. (P.S. DO NOT STEAL OUR IDEA! We also joked about someday opening a 'comfort food' restaurant and calling it Salt & Brown. THIS IS NOW A LEGAL DOCUMENT! HANDS OFF OUR AWESOME NAME! Ha!)