Sunday, November 30, 2008

Oven-baked salmon with beetroot


I've been asked to come up with various Christmas menu options - but by the readers of my Estonian site as well as some university friends. One of the menus is fish-centered, so for the last week I've tried to come up with a suitably festive main course. Although various white fish (pike-perch aka zander, Northern pike etc) are more traditional here in Estonia, then fresh Norwegian salmon is easily and universally available across the country. Therefore I've decided to use a red fish at the centre of my fish menu. Inspiration for this comes from a Finnish Ruokamaailma magazine, but I've tweaked it sufficiently to consider the recipe my own. I served it last night to a group of friends who came over for some food and board games, and it was very well received :)

So, for Christmas 2008 the Beetroot Princess suggests:

Oven-baked salmon with beetroot
(Ahjulõhe peediga pühadelauale)

Serves 6


1 kg salmon filet, trimmed
2 tsp salt
0.5 tsp freshly ground black pepper
2 Tbsp finely chopped fresh dill
about 3-4 small cooked beets (either boiled or roasted)
2 Tbsp olive oil

Carefully remove all pin-bones from the salmon filet. (I like to cut off the thin side of the salmon filet and use that for another dish - perhaps soup - on the following day. I think the thick part of the filet looks much more festive, plus you it's easier to cook the fish uniformly).

Cut the fish filet into thick portions (this helps to serve the fish nicely later), but leave the skin intact. Place in an oiled oven dish. Season with salt and pepper and scatter lots of chopped dill on top.

Peel the beets and cut into thin slices. Using a small shot glass, cut the slices into uniformly sized small rounds. Layer these like fish scales on top of the salmon. Drizzle with olive oil.


If you like dill, then you can scatter more dill on top at this stage.

Cover the oven dish with a piece of foil and bake in a pre-heated 200 C / 400 F oven for 20-30 minutes, depending on the thickness of the fish and desired level of pinkness.

Serve with steamed couscous or boiled potatoes.

This month's installment of Waiter, there's something in my...! is all about ROASTS, everybody's favourite Sunday meal, and hosted by my dear friend Johanna. This is my contribution :)

Friday, November 28, 2008

happy thanksgizzzzzzz

cro

Oh man, Thanksgiving was delightful. Please enjoy this photo of my apple tart (this recipe) that I made. Now, excuse me while I go pass out for 3 days straight. See you on Monday, guys!

Thursday, November 27, 2008

quick cranberry sauce.

So, last night as Summer and I indulged in a pie extravaganza, I asked her if there was anything else I could help her out with before I went home, knowing she had a big day of cooking ahead of her. She shrugged, looked around, and said I could make the cranberry sauce. She handed me a battered old cookbook and pointed out the recipe.

cranberrysauce

I know that yes, the simplest cranberry sauce comes from a can, but everybody always makes fun of that cylinder of jelly- the idea of making my own cranberry sauce is very appealing. And it only took a few seconds to throw everything together.

You need:

2 cups of granulated sugar
2 cups of water
1 lb. of fresh cranberries

and- optional, Summer likes to add chunks of fresh orange to hers.

Just bring the water and sugar to a boil, and boil for 3-5 minutes. Add cranberries, bring back to a boil, then lower heat a little bit and allow to cook without stirring for a few minutes until the cranberry skins begin to pop (I had to do a little bit of stirring because the liquid didn't quite cover the cranberries). Add orange chunks, if you wish. Remove from heat and allow to cool to room temperature before refrigerating.

cranberrysauce2

late night pie party! (happy thanksgiving, everyone!)

Well, between planning a blogger get-together in December, scrambling around to get Thanksgiving stuff done, and dealing with our crazy toddlers, Summer and I have been pretty busy. The other day we took a coffee break and walked over to Stumptown, and on the way back we happened by a large pile of free stuff on the side of the road. Score! Summer snagged a handful of old Martha Stewart Living magazines from the mid 90's (and hey- don't get all butthurt. 1998 was a decade ago, okay?), and one of them had instructions for decorating gorgeous pies. It was perfect- Thanksgiving was on its way in, and here we were, staring down inspiration for some of the cutest pies we'd ever seen.

piebraid

One of the designs really jumped up at us- a simple braid of pie crust ringing a cute little pie. Summer and I are both suckers for braids, and we couldn't resist. Summer invited me over for a pie-decorating party (she knows how much I love to decorate pies. Seriously, it's awesome.) and I stayed over until almost midnight helping decorate and bake a couple of pies, and helping out with a few other preparations for tomorrow's feast. It was great because I'm not in charge of anything fun for our family's Thanksgiving (we're making biscuits and green bean casserole. BOOOORING.) so I got a chance to do some cute seasonal stuff, even if we don't get to eat any of the ones I decorated.

piebraid2

For the braided pie, the instructions in the Living mag weren't that specific, it just showed how to braid the dough and didn't really mention how to get it on there. Well, I just kind of went for it, using water to stick the braid on and covering the seams that didn't match up so great with little leaf cutouts. Sadly, the braid was too wide and the lip of the dish wasn't very big, so the braid slid down the edges in some places. The final product was kind of sad, honestly, but I've learned my lesson for next time and I'm excited to give it another try soon.

isortarule

The other design that popped out at us was a simple floral design around the edges of a pie. We decided to throw some flower cutouts on top of the other pie we put together, a deep-dish apple pie.

IRULE

I was VERY pleased with the result of this pie- it's adorable! It did melt down a little bit in the oven (this was the vegan pie, I don't know if that made any difference) but the flowers held their shape fine and it looks just lovely.

IRULE2

To form the leaves and flowers, I just used some fondant cutters that Summer had laying around- but you could easily use a sharp knife to cut out shapes freehand. Adhere them to the crust using egg wash, or milk, or water. I could have spent all night sticking flowers to this pie, but I showed a small amount of restraint and took Summer's advice to stop while it was well-balanced.

If you're reading this, thinking- "Hey! I want to make an apple pie, dangit!" Go ahead and check out our favorite apple pie recipe, found here. We also have a pumpkin pie recipe that was pretty tasty, right here. If you just need a solid pie crust recipe to make adorable designs, look no further than our goddess, Martha herself.

I hope everyone has a safe and happy holiday, celebrating with anyone you can find! And eat pie!

pieeee

Wednesday, November 26, 2008

peanut butter kisses.


You know those cookies that, when you bite into them, they give you a feeling of complete comfort? The kind of cookie that is rather impossible to eat only one of? The cookie that doesn't try to be fancy or complicated, but is just perfectly good in all its wonderful simplicity?

Well, these are those cookies.

Since we get very few trick-or-treaters at our house and our kids brought home a ton of neighbor-acquired loot, we were left with an enormous amount of candy from Halloween. It has been very slowly diminishing from cookie jars during the past month, but we still have more than we know what to do with. When asked sweetly by my toddler if we could make some cookies a couple of nights ago, I thought it would be a wise idea to bake them using some of the excess confections. We had an unopened bag of these candy corn-striped white chocolate kisses, so these delicious peanut butter kiss cookies were born.

And sigh, I hate to admit it, I really do, but I ate about twelve of these. PMS is a bitch.


Peanut Butter Kiss Cookies

Ingredients:

1/2 cup granulated sugar
1/2 cup firmly packed brown sugar
1/2 cup butter or margarine, softened
1/2 cup creamy peanut butter
1 egg
1 teaspoon vanilla extract
1/4 teaspoon salt
1 3/4 cups all-purpose flour
1 teaspoon baking soda
1/4 cup sugar, for rolling
24-48 chocolate candy kisses, unwrapped (number depends on the size of the cookies)

Directions:

Preheat oven to 375 degrees F.

Combine 1/2 cup granulated sugar, brown sugar, butter and peanut butter in large bowl. Beat at medium speed until light and fluffy. Add egg, vanilla and salt; continue beating until well mixed. Add flour and baking soda. Continue beating, scraping bowl often, until well mixed.

Shape dough into 1 or 2-inch balls. (If dough is too soft, refrigerate 30 to 60 minutes.) Roll balls in 1/4 cup sugar. Place 2 inches apart onto ungreased cookie sheets.

Bake for 8 to 10 minutes or until very lightly golden brown. Immediately press 1 chocolate kiss in center of each cookie. Remove from cookie sheets; cool completely on wire racks.

Stir-fried Cherry Tomatoes with Basil


This must be one of the quickest - and most colourful - side dishes I've made in a while. Having spent all day at yet another cookery course today, testing several sweet Christmas tarts and fancy cakes, I needed something savoury and easy tonight. I went for one of my stand-bys - battered and pan-fried white fish (I used a pangasius filet, which I dipped into a mixture of egg-flour-milk), and chose this colourful recipe I spotted in a Finnish magazine yesterday. It was a success - quick, different, slightly tangy, slightly sweet, and very beautiful.

Stir-fried Cherry Tomatoes with Basil
(Vokitud kirsstomatid basiilikuga)
Adapted from Suomen Kuvalehti Gourmet 4/2008
Serves 4


4 Tbsp (olive) oil
500 g cherry tomatoes
1 garlic clove
handful of fresh parsley
20 large fresh basil leaves
1 tsp fresh thyme leaves
2 tsp caster sugar
salt
coarsely ground black pepper

Rinse the tomatoes and dry thoroughly. Chop the garlic, parsley and basil finely, place into a small bowl.
Heat oil in a wok or frying pan until very hot. Add cherry tomatoes, season with salt, sugar and pepper. Reduce the heat and stir-fry the tomatoes for a couple of minutes, shaking the pan every now and then.
Sprinkle the garlic and herb mixture on top, give the tomatoes another stir and serve at once.

Tuesday, November 25, 2008

persimmon tartlets with cream filling.


The other day, while my husband was outside raking leaves, our next door neighbor handed him a huge bundle of persimmons from his tree. When he brought them inside, I immediately began coming up with things I might be able to do with them. I fell in love with the idea of a steamed pudding baked in an antique mold, but decided against it once I realized the dessert would take almost three hours to finish (truth be told, I am not the most patient of bakers). The more I searched for recipes, the more I realized that persimmons are not the most popular of fruit to bake with. It seems that there is only a small handful of recipes that are changed slightly and used all over the place: persimmon bread, persimmon cookies, and the pudding, none of which I was very keen on making. What was I to do? They were just too pretty to not use in something.


Thankfully, ole' Martha Stewart had the answer, and a very simple one at that. Tucked within the pages of her classic cookbook, I found the recipe for these Persimmon Tartlets baked with puff pastry (something I always seem to have in my freezer these days) and filled with either lemon curd or persimmon cream. They sound and look quite fancy, but are extremely easy to quickly whip up. This happens to be yet another one of those recipes that is very versatile. The cream filling can easily be whipped with smushed berries or finely chopped chocolate and topped with the fruit of your choice. Also, feel free to experiment with different sizes: go ahead and make teeny bite-sized ones or a full-size tart. Just adjust your baking time accordingly.


Persimmon Tartlets with Cream Filling: adapted from The Martha Stewart Cookbook

Ingredients:

1/2 pound puff pastry, chilled
1/2 cup heavy cream, cold
1/2 cup lemon curd or pureed persimmons
2 unbruised but ripe persimmons, cut lengthwise into slices 1/8" thick (instead of regular slices, Alice cut thin slices into shapes with a fondant cutter- a small cookie cutter would also work for this)

Directions:

Roll out the puff pastry to a thickness of 1/8 inch. Using a large biscuit cutter or the rim of a glass, cut 8 rounds of pastry. Then using a 3 1/2-inch ring or a smaller glass, cut 4 of the rounds into smaller rounds, centering the ring so that an even rim is produced. Paste the rims onto the larger rounds at the outside edge with a bit of water, carefully aligning the edges; this forms a raised border on the tartlet. Place the pastry on a parchment-lined or water-sprayed baking sheet and chill for at least 30 minutes.

Preheat the oven to 400 degrees F. Prick the bottom of each pastry, line only the bottom with foil (I just cut tiny circles and fit them to the inner circle) and weight with dried beans or pie weights, being careful not to weight the edges. Bake the rounds for approximately 10 to 15 minutes, until they are puffed and golden. Remove the liner and weights and let cool completely on a rack before filling.

Whip the cream to soft peaks and gently fold in the lemon curd or persimmon puree. Mound or pipe the mixture into each tartlet shell. Top each with a slice or two (or three!) of persimmon, and serve immediately.

Saturday, November 22, 2008

a holiday pie and the love of a television show.


Oh, pie. Those of you who know me well know of my pie obsession, an obsession that has no obvious root but was suddenly sparked about ten years ago. Back then, I never baked them, just fully enjoyed their comforting taste, frequently given to me for free by a rebellious waitress at a local diner. A couple years down the line, pie nights with friends began, a gathering in which each of us would bring our favorite pie (I used to joke that I could easily guess a person's favorite by what their personality was like). And then Los Angeles' House of Pies was discovered, which quickly became a weekly spot for friends to play board games and laugh over flaky pie crust. As you can see, pie eating was a part of my social life.

Even with all that pie love back then, it wasn't until I baked a pie from scratch all by myself that I truly discovered my deep love. I do not mean buying a frozen crust and a can of filling, but working a dough together with my hands, rolling it out, chopping the fruit, adding the spices & sugar, and putting it all together. What can I say? It is easily one of my favorite ways to spend my time. I am quite sure I could do it every single day and be perfectly content.


With this fact about myself, it was no surprise that I fell madly for the television show Pushing Daisies. If you have yet to see it, the show revolves around a sweet pie-maker by the name of Ned who has the power to bring the dead back to life by a single touch, but only for a minute or someone close-by will die in their place. He lives above his pie shop, humorously called "The Pie Hole", with the love of his life, a vintage dress-clad girl by the name of Chuck, his childhood sweetheart who he brought back to life and cannot touch or she will die again. The show is beautiful and quirky, fairy-tale-like, mysterious, and has the set of a pie-lover's dream.

While flipping through an issue of Martha Stewart Living, I happily came across an advertisement for Pushing Daisies that featured a scrumptious-sounding pie recipe. It was quickly torn out of the magazine and hung on my fridge for a day when I had all of the ingredients, which happened to be yesterday. On the recipe, it is just called a Pear Pie, but it is much more than that. To me, it is the perfect holiday pie, stuffed full of fresh pears, cranberries, and toasted pecans, which ended up being a delicious combination of tart and sweet flavors. I guess Ned the Piemaker knows his pies.

*A sad note: Ironically, this pie was baked on the day that it was officially announced that Pushing Daisies is being canceled. Now it's time to go cry in my pie.


Ned and Chuck's Perfect Pear Pie

Ingredients:

1 pie dough for 2 crusts (in the original recipe, there are ingredients for one, but I used my favorite, which can be found here)
1 cup pecan pieces, toasted
3/4 teaspoon ground cinnamon
1 teaspoon kosher salt
1/2 cup packed dark-brown sugar
1 1/2 cups fresh or frozen cranberries
2 1/2 pounds pears, peeled, cored, cut into medium pieces
1 tablespoon unsalted butter, in pieces
2 tablespoons instant tapioca
1 large eggs
sanding sugar (optional)

Directions:

On a lightly floured surface, roll out one half of your dough to a 12-inch circle. Brush off excess flour. Fit dough to a 9-inch pie dish. Press edges down around the inside. Trim dough to a half inch over the dish. Roll out remaining half of dough. Transfer disk to a parchment-lined baking sheet. Chill pie shell and disk of dough. If desired, roll out the remaining dough scraps into a thin disk. Cut out shapes with a small leaf cutter. Chill the leaves on the baking sheet with the disk of dough.

In a large bowl, combine the pecans, cinnamon, salt, sugar, cranberries, pears, butter, and tapioca. Toss well. Transfer the mixture to the cold pie shell.

Whisk the egg with 2 teaspoons of water. Brush the egg glaze around the rim of the dough. Transfer the cold disk of dough on top, press down gently. Press the top and bottom pieces of dough together, around the rim. Trim the top dough with scissors to about 1 inch. Fold it under. Crimp the edge of the pie as desired. Brush the surface of the pie with the egg wash. Make 3 slits in the top for steam to escape. If using, apply the cold leaves to the top of the pie with the egg wash. Sprinkle sanding sugar over the top if desired. Freeze the pie for 30 minutes to firm up the butter. Heat the oven to 400 degrees F, with a rack in the lower third.

Bake until the crust begins to brown, about 20 minutes. Reduce heat to 350 degrees F. Continue to bake until the crust is richly golden brown, rotating as needed, 40 to 55 minutes. Transfer pie to a wire cooling rack. Cut when cool. Pie may be kept and room temperature up to 2 days, lightly covered with plastic wrap.


this slice was perfect, but Alice couldn't resist grabbing a chunk of the fabulous crust.

Thursday, November 20, 2008

kentucky buttermilk cake.


As I mentioned in the previous post, I had a carton of buttermilk that I needed to use right away. After making the buttermilk biscuits, I started browsing online for other buttermilk recipes and came across a recipe from the Washington Post for a Kentucky Buttermilk Cake. I had these tiny tube pans from an estate sale that I had yet to use, so I made two of these sweet, simple cakes.

This cake tastes very much like a classic pound cake, which means it can easily be changed around and fancied up to your liking. Make two or cut one in half and layer it with jam or whipped cream and top with berries or shaved white chocolate. Or you can add chocolate chips, nuts, rosewater, butterscotch extract, etc. to the batter- you get the idea.

If you are curious as to why the cakes are two completely different colors, it was a complete mystery to me until I was washing the pans last night and noticed that I had not two, but three tube pans- two of the were stacked inside one another, causing it to bake a little differently. Silly me.


Kentucky Buttermilk Cake: recipe from the Washington Post

Ingredients:

For the cake
3 cups flour
1 teaspoon baking powder
1 teaspoon salt
1/2 teaspoon baking soda
4 large eggs
1 cup whole or low-fat buttermilk
2 teaspoons vanilla extract
8 ounces (2 sticks) unsalted butter, at room temperature
2 cups sugar
For the sauce
1 cup sugar
1/4 cup water
4 ounces (1 stick) unsalted butter
1 tablespoon vanilla extract

Directions:

Preheat the oven to 325 degrees F. Lightly grease the inside of a 10-inch tube pan or bundt pan with nonstick cooking oil spray. Dust with flour.

For the cake: Sift together the flour, baking powder, salt and baking soda on a sheet of waxed paper. Combine the eggs, buttermilk and vanilla extract in a medium bowl.

Combine the butter and sugar in the bowl of a stand mixer or an electric hand-held mixer; beat on medium speed until light and fluffy. Add alternating amounts of the sifted dry ingredients and the egg mixture, ending with the wet ingredients. Pour the batter into the prepared pan and bake for 50 to 60 minutes or until a long toothpick inserted into the cake comes out clean. Cool in the pan for 15 minutes, then remove from the pan and transfer to a cake plate.

While the cake is baking, make the sauce: Combine the sugar, water and butter in a small saucepan over medium-low heat. Cook, stirring occasionally, until the butter has melted and the sugar has dissolved to form a thin glaze. Remove from the heat and add the vanilla extract, stirring to combine.

Use a toothpick or skewer to poke a few holes in the top of the cake. Pour the warm sauce over the warm cake. Let sit for 10 minutes before serving.

Coffee Cake


When I first started reading English-language cookbooks I was baffled by coffee cake recipes that had no coffee inside. You see, in Estonia we bake and eat lots of cakes (I've baked a cake to go with coffee each day this week), but they're not called "kohvikook" or "coffee cake". They're called just cakes, and we enjoy them with coffee. Meanwhile, I've been baking a coffee cake - that is, a cake that contains coffee crumbs - for over a decade now. And here's a recipe - originally from a Finnish food magazine in early 1990s, and I've made it over and over again. There's something about eating a coffee cake while drinking coffee, you see.

Note that I use simple ground coffee in the cake, not the instant kind. K. originally thought there were poppy seeds in the cake :P

Coffee Cake Recipe
(Kohvikook)

250 g unsalted butter, at room temperature
250 ml / 1 cup / 225 g caster sugar
3 eggs
500 ml / 2 cups all-purpose/plain flour
2 tsp baking powder
3 heaped Tbsp ground coffee
2 tsp vanilla sugar
50 ml / 3-4 Tbsp milk

For the frosting:
4 Tbsp cold coffee or coffee liqueur
appr. 200 g icing sugar

For decoration:
coffee bean shaped chocolate

Cream butter and sugar until pale, then whisk in eggs, one at a time.
Measure dry ingredients into a bowl, mix thoroughly and then stir into the butter and egg mixture alongside with milk. The resulting batter is quite thick, but still spoonable.
Spoon the batter into a buttered small oven tray (f.ex. 30x30 cm). Bake in the middle of a pre-heated 175 C oven for about 25 minutes, until the cake is cooked (test for doneness with a small wooden cocktail stick).
Let cool.
Mix the coffee and icing sugar into a glossy frosting and drizzle over the cake. Decorate with chocolate 'coffee beans'.

Wednesday, November 19, 2008

buttermilk biscuits & slow cooker applesauce.


One of my weekly routines is skipping breakfast at home on Saturday mornings and heading out to the downtown farmer's market. My husband usually gets a breakfast burrito or a hash from a couple of carts, but I am quite loyal in buying a biscuit with honey, whipped butter, and fresh fruit from Pine State Biscuits' stand. Sure, their restaurant is on my side of town, but there is something different about eating my warm buttery biscuit outside while watching the hustle and bustle of people going by.

Yesterday afternoon, while cleaning out my fridge, I found a carton of buttermilk that needed to be used immediately. So, of course, what came to mind? Recreating my own flaky and buttery buttermilk biscuits at home. I have made biscuits many times at home (frequently using Bobby Flay's recipe), but I am quite sure that these were the best ones that have come out of my oven.

Instead of stuffing them with fresh fruit, they were piled high with homemade applesauce that I had made in my crock pot the following day. I was quite impressed with just how good the applesauce had turned out from being slow cooked all day long. The apples cooked down perfectly and the sugar and spices added such a nice flavor. Yum.


Southern Buttermilk Biscuits: recipe from RecipeZaar

Ingredients:

2 cups unbleached all-purpose flour, plus more for dusting the board
1/4 teaspoon baking soda
1 tablespoon baking powder (use one without aluminum)
1 teaspoon kosher salt or salt
6 tablespoons unsalted butter, very cold
3/4 cup buttermilk (approx.)

Directions:

Preheat your oven to 450 degrees F.

Combine the dry ingredients in a bowl, or in the bowl of a food processor. Cut the butter into chunks and cut into the flour until it resembles course meal. If using a food processor, just pulse a few times until this consistency is achieved. Add the buttermilk and mix JUST until combined. If it appears on the dry side, add a bit more buttermilk.

Turn the dough out onto a floured board. Gently, gently PAT (do NOT roll with a rolling pin) the dough out until it's about 1/2" thick. Use a round cutter (or the rim of a small glass) to cut into rounds. You can gently knead the scraps together and make a few more, but they will not be anywhere near as good as the first ones.

Place the biscuits on a cookie sheet- if you like soft sides, put them touching each other. If you like"crusty" sides, put them about 1 inch apart- these will not rise as high as the biscuits put close together. Bake for about 10-12 minutes- the biscuits will be a beautiful light golden brown on top and bottom. Do not overbake.

*Note: The key to real biscuits is not in the ingredients, but in the handling of the dough.


Slow Cooker Applesauce: recipe also from RecipeZaar

Ingredients:

4 pounds tart apples, cored and sliced thin (I also peeled mine, but it's not required)
1/2 cup sugar
1/2 teaspoon cinnamon
1 cup water
1 tablespoon lemon juice

Directions:

Mix apples (about 12 cups) with cinnamon and sugar and put into crock pot. Pour water and lemon juice over apples.

Cook on low for 6 hours or high for 3-4 hours.

Creamy Fish Soup


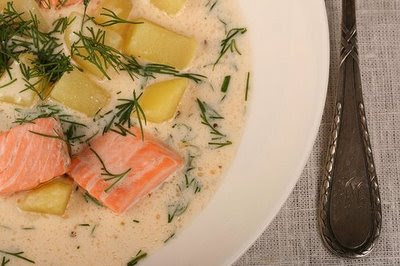
I just realised that I've been posting nothing but dessert recipes in November. That's no good, is it? Hence this creamy-cheesy fish soup recipe today. A similar recipe has appeared in several Finnish food magazines and at least one local magazine. With a few tweaks here and there, I ended up with this lovely, creamy fish soup. Feel free to experiment with differently seasoned cream cheese. I used trout, as it's lighter, but salmon would work well, too..

A lovely weeknight dinner, and it should appeal to small picky eaters, too.

Creamy Fish Soup
(Juustune forellisupp)
Serves 4

1.5 litres fish stock
5 potatoes, peeled and cubed
200 g tub cheese spread (something like this), I imagine)
170 g tub flavoured cream cheese (I used tomato & pesto)
300 g fish filet, cubed (salmon, trout)

To serve:
fresh dill, chopped
black pepper, coarsely ground

Bring the fish stock* to the boil. Add potato cubes and simmer, until tender (10-15 minutes).
Meanwhile, cut the fish into large cubes, taking care to remove any pin-bones.
Remove the saucepan from the heat, stir in the melted cheese spread and cream cheese, spoonful at the time.
Put the saucepan back onto the heat, add the cubed fish. Simmer on a low heat for a couple of minutes, until the fish is cooked through.
Ladle into soup bowls, sprinkle with chopped dill and grind some black pepper on top.

* If using home-made fish stock, then good for you. If you're using good-quality fish bouillon cubes, then take just 1 cube for 1.5 litres of water - the fish and cheese give plenty of flavour -and saltiness - themselves and you don't want the soup to be too salty.

Tuesday, November 18, 2008

a classic pumpkin pie.


I am pretty sure that it goes without saying that few things signify this time of year more than pumpkin pie. Whether it was purchased from the freezer section of a grocery store or baked at home by my grandmother, I am quite sure I have eaten some every year around this time since I was born. And when it comes to Thanksgiving, there have always been two dishes that have held the most importance to me: sweet potatoes smothered in some kind of marshmallow topping and pumpkin pie with whipped cream piled high on top. What can I say? I am rather old fashioned.

This year will mark the fourth year that I will be cooking Thanksgiving dinner by myself (although this will be the first year that my mom will be in town helping out). I usually have always used this recipe (Martha, you know I love you), but this year I wanted to try something new. While at the farmer's market a couple of weeks ago, I spotted a stand with a ton of inexpensive sugar pumpkins and a pile of printed out recipes next to them. I decided right then that this would be the year that I make a pumpkin pie from an actual pumpkin and not just a can of puree.

Since I had never done it before (I am not even sure I have even eaten a pie made from fresh pumpkin), I thought it would be a wise idea to try it out ahead of time - and really, two pies in a couple week's time is better than one. Alice was also intrigued by the idea so she came on over to help me out with the process. Thanks to her, my little sugar pumpkin was hacked up, steamed, and separated from the skin in no time. Do you want to know a secret? Alice has never, ever had pumpkin pie. And she still hasn't, since she had to bring her son home before it was fully set. I am going to have to make her come over today for a slice- she's been missing out.


Here is how to make your own pumpkin puree: Start with a small-medium sugar pumpkin, cut out the stem, and scrape out the gooey guts & seeds (save the seeds if you want to roast them). Cut into large chunks and steam/boil in a saucepan with a couple inches of water at the bottom, until soft. Scoop out (or, as Alice did, just squeeze the skin right off). Either use a potato masher to mash it up or run through a food mill or food processor to make extra smooth. (Alternatively, you can do it this way, which consists of baking the pumpkin instead of boiling it- I find boiling it easier, but I am assuming that baking the pumpkin creates a richer flavor).

Also, that pumpkin size (as you can see from the picture of me holding it) made exactly 4 cups of pumpkin puree, which is enough to make two pies. This made me quite happy, since I now have the extra 2 cups sitting in my freezer, ready for Thanksgiving.


This was the first time in awhile that I strayed away from the King of the Pie Crusts and sadly, it wasn't such a good idea. The crust I used, a recipe from the Chocolate and Zucchini Cookbook has been good in the past for making small tarts, but just didn't cut it for the pumpkin pie. I will say, however, that it worked just perfectly for the adorable leaf designs that Alice created (that I sprinkled with cinnamon sugar) for the top. But do me a favor- make the perfect pate brisee recipe. You won't be sorry.


Old Fashioned Pumpkin Pie: recipe from the farmer's market

Ingredients:

2 cups of pumpkin pulp puree from a sugar pumpkin
1 1/2 cups of heavy cream or 1 12oz. can of full-fat evaporated milk
1/2 cup packed dark brown sugar
1/3 cup white sugar
1/2 teaspoon salt
2 eggs plus the yolk of a third egg
1 1/2 tablespoons of pumpkin pie spice (you can make your own by combining 2 teaspoons of cinnamon, 1 teaspoon ground ginger, 1/4 teaspoon ground nutmeg, and 1/4 teaspoon ground cloves)
1 good crust

Directions:

Preheat the oven to 425 degrees F.

In a large bowl, mix together sugars, salt, and spices. Beat the eggs and add to the bowl. Stir in the pumpkin puree. Stir in the cream. Whisk all together until well incorporated.

Pour into pie shell and bake at 425 for 15 minutes. After the 15 minutes, reduce the temperature to 350 degrees F. Bake for 40-50 minutes, or until a knife inserted in the center comes out clean.

Cool on a wire rack for at least 2 hours, until fully set. Serve with whipped cream.

banana cookies.


Here we go again- yet another week where I bought more bananas than I could possibly digest. For a long while, I never seemed to be buying enough of them; now I always seem to have piles turning a nasty shade of brown up in my hanging fruit basket. So yet again, I am left with the choice to either throw them out or bake something with them- of course, I chose the latter.

I don't know why, but there is something that just sounds so nice about banana cookies. I picture them being gobbled up by kids on picnics to the park or written about in old children's books. Perhaps I am just silly like that.

Anyways, these cookies are quite delicious. They remind me a lot of banana nut muffin tops, only a bit chewier and less crumbly. They have a rich natural banana flavor and cake-like texture- Believe me, I think you're going to like 'em.


Banana Cookies: recipe from Simply Recipes

Ingredients:

1/2 cup (1 stick) of unsalted butter, room temperature
1 cup of sugar
1 egg, room temperature
1 cup of mashed bananas (about 2 1/2 large bananas)
1 teaspoon of baking soda
2 cups of flour
pinch of salt
1/2 teaspoon of ground cinnamon
1/2 teaspoon of ground mace or nutmeg
1/2 teaspoon of ground cloves
1 cup of pecans (walnuts and chocolate chips are fine alternatives)

Directions:

1 Preheat the oven to 350 degrees F. Cream the butter and sugar together until light and fluffy. Add the egg and continue to beat until the mixture is light and fluffy. In a bowl, mix the mashed bananas and baking soda. Let sit for 2 minutes. The baking soda will react with the acid in the bananas which in turn will give the cookies their lift and rise.

Mix the banana mixture into the butter mixture. Mix together the flour, salt, and spices and sift into the butter and banana mixture and mix until just combined.

Fold into the batter the pecans or chocolate chips if using. Drop in dollops onto parchment paper-lined baking sheet. Bake for 11-13 minutes or until nicely golden brown. Let cool on wire racks.

pumpkin chocolate chip cupcakes? muffins?


I am hesitant about calling these cupcakes, even if the recipe does come from a specific cupcake cookbook. With the suggested cinnamon frosting, sure, but really, these are absolutely perfect on their own. In my humble opinion, frosting is going a bit too far- these sweet Autumny treats shine with their simplicity of combining two flavors that go together so well: pumpkin and chocolate. All they require is a light dusting of powdered sugar and a cool fall night. Actually, neither of those are required, but they sure can't hurt.

Please note, these are vegan. If you do not have soy milk (and don't mind dairy), feel free to add a little regular milk.


Pumpkin Chocolate Chip Cupcakes (or Muffins): adapted from Vegan Cupcakes Take Over the World

Ingredients:

1 cup canned pumpkin puree
1/3 cup vegetable or canola oil
1 cup granulated sugar
1/4 cup soy milk
1 teaspoon vanilla extract
1 1/4 cups all-purpose flour
1/2 teaspoon baking powder
1/2 teaspoon baking soda
3/4 teaspoon ground cinnamon
1/4 teaspoon salt
1/2-3/4 cup chocolate chips

Directions:

Preheat oven to 350 degrees F. Line muffin pan with cupcake liners.

In a medium bowl, stir together the pumpkin, oil, sugar, soy milk, and vanilla. Sift in the flour, baking powder, baking soda, cinnamon, and salt. Stir together with a fork- don't use an electric mixer, as it will make the batter gummy. Once well combined, fold in the chocolate chips.

Fill liners two-thirds full and bake for 22 to 25 minutes. Transfer to a wire rack. Dust with powdered sugar once cool.