Friday, October 31, 2008

WTISIM: Pumpkin and Ginger Teabread


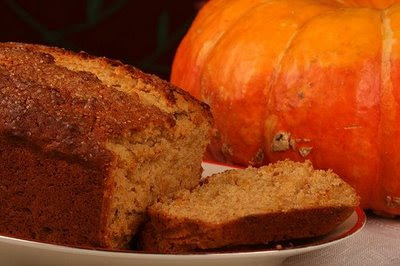
It's been a while since I took part at the Waiter there is something in my ... blog event, organised by Andrew, Johanna and Jeanne. This month's event is hosted by Jeanne, who has chosen the Cucurbitacae family as a theme, or if you want a more poetic title, For the Love of Gourd. I've been featuring quite a few pumpkin recipes recently on my blog - pumpkin and flowering quince jam, pumpkin and ginger jam, pumpkin and nutmeg soup, to name just the last three. But I wanted something more mainstream this time, so I baked a pumpkin and ginger loaf, or a teabread.

This pumpkin loaf is somewhat different, as it uses grated raw pumpkin instead of cooked pumpkin purée. It's a slightly modifying recipe from BBC Good Food (November 2002). When I baked it few weeks ago, I had run out of those delicious Buderim ginger nibbles that you can buy at Lakeland stores in the UK. If I had had them at the time, I would have certainly thrown in a generous handful of them, for sure..

Pumpkin Loaf with Ginger
(Sügisene kõrvitsakeeks ingveriga)
Serves 10

175 g butter, melted
140 g runny honey
1 large egg
250 g raw butternut squash or pumpkin, coarsely grated
100 g light muscovado sugar
350 g plain flour
2 tsp baking powder
1 Tbsp ground ginger
2 Tbsp demerara sugar

Mix melted butter, honey, whisked egg and grated pumpkin in a blow. Fold in the flour, baking powder and ground ginger.
Spoon the batter (it's quite heavy) into a buttered and lined loaf tin, sprinkle with demerara sugar.
Bake in the middle of 180 C/350 F oven for 50-60 minutes, until the cake is golden brown and nicely risen.
Cool in the tin for 5 minutes, then remove from the tin and cool completely on a metal rack.

Slice and serve with butter. Mmmm...

Thursday, October 30, 2008

country crust bread (and a love of old cookbooks).

my vintage cookbooks.

People who know me well know of my obsession with old things. Our home (which is quite old itself, built back in 1904) is filled with little pieces that date from the twenties to the eighties. I have an obvious taste for sweet vintage childlike items and who would have guessed it, kitchen antiquities. More than any other room in our household, our kitchen contains the highest amount of the small things I have collected from constant trips to thrift stores and estate sales (I generally refuse to pay more than $10 for one item, though most are closer to the $1 range). Favorite things to collect include old cake tins, ceramic bakeware, aprons, and of course, cookbooks. My ever-growing vintage cookbook collection is a very special thing to me. I completely adore ones with cursive handwritten notes written in the margins, cut-out recipes tucked inside the pages, and typed family recipes bound in rings. I cannot help but fondly think of grandmothers and housewives back in the forties and fifties baking these beautiful home-cooked creations, back in the time when baking and cooking full meals was a part of normal daily life. There is just something sweet about it.

old cookbook.

At an estate sale down the street a couple weeks ago, I purchased a tiny stack of cookbooks for a mere 25 cents each. I was happy to find a bread cookbook by Better Homes and Gardens that had been stuffed with personal bread recipes from the owner. I came across a Betty Crocker one that seemed to be torn from a pamphlet, a recipe for a Country Crust Bread that seemed rather simple. I put it all together yesterday afternoon, threw it in my Kitchenaid mixer, folded it, and had a lovely loaf to go with a creamy vegetable soup for dinner. I admit, my folding skills weren't amazing so the loaves weren't very beautiful, but baby, it was tasty.


Country Crust Bread

Ingredients:

2 packages active dry yeast
2 cups warm water (105 to 115 degrees)
1/2 cup sugar
1 tablespoon salt
2 eggs
1/4 cup oil
6 to 6 1/2 cups bread flour
soft butter or margarine

Directions:

Dissolve yeast in warm water. Stir in sugar, salt, eggs, oil, and 3 cups of the flour. Beat until smooth. Mix in enough remaining flour to make dough easy to handle. Turn dough onto lightly floured board; knead until smooth and elastic, 8 to 10 minutes. Place in a greased bowl; turn greased side up. (At this point, dough can be refrigerated for 3 to 4 days.) Cover; let rise in a warm place until doubled, about 1 hour (Dough is ready if impression remains.)

Punch down dough; divide in half. Roll each half into a rectangle, 18x9 inches. Roll up, beginning at short side. With side of hand, press each end to seal. Fold ends under loaf. Place seam side down in greased loaf pan. Brush loaves with a little oil. Let rise until doubled, about another hour.

Preheat oven to 375 degrees F. Place loaves on lower oven rack so that the tops of the pans are in the center of the oven. Pans should not touch each other or sides of oven. Bake 30 to 35 minutes or until deep golden brown and loaves sound hollow when tapped. Remove from pans. Brush loaves with butter; cool on wire rack.

Makes two loaves.

Wednesday, October 29, 2008

Another pumpkin jam, this time with flowering quinces


My loyal readers may remember that photo collage of flowering quinces from last summer, when I made flowering quince extract and flowering-quince and apple jam. Well, I made several other jams using flowering quinces from my mum's backyard this autumn. One of our favourite ones was this pumpkin jam (yep, just as nice as this ginger and pumpkin jam) . It's a lovely thick jam - flowering quinces are very high in pectin, with a beautiful yellow colour (well, it's mostly pumpkin after all), with a nice acidity lended by the flowering quinces. Another excellent jam to be spread on your breakfast or afternoon toast or English muffin.

NB! Note that flowering quince (Chaenomeles Lindl) and quince (Cydonia oblonga) are related, but NOT the same fruit (quite confusingly, all quinces flower, but that's another topic altogether).

Cleaning flowering-quinces for jam-making can be quite a pain. The fruit are hard and small. The best result is to find a comfortable place to sit on, put on your favourite album or switch on your favourite TV channel. Place three bowls in front of you - one filled with washed floweringquinces, one smaller bowl for piths and seeds, and one for cleaned flowering quince slices. Take a small, sharp knife (a vegetable peeling knife works well), and work away :)

Pumpkin Jam with Flowering Quinces
(Kõrvitsa-ebaküdooniamoos)


1 kg pumpkin flesh, cut into small cubes
1 kg flowering quinces, deseeded and cut into quarters
500 ml (2 cups) of water
1 kg caster sugar

Place the pumpkin and flowering quinces into a large saucepan. Add water. Bring to the boil and simmer on a low heat for 15 minutes, skimming any froth that appears on the surface. Stir every now and then.
Add sugar and bring to the boil again. Remove from the heat and cool.
Bring everything to the boil again and simmer for 10-15 minutes, stirring every now and then, until the pumpkin is soft and the jam has thickened.
Distribute into hot sterilised jars and close. Keep in a cool place.

chocolate sandwich cookies.


It has been a tough few days here in my household. I won't go into the details of the accident, but over the weekend, my three-year old managed to get his thumb completely crushed, resulting in fractured bones and hand surgery. He has been a real trooper when dealing with the pain, but he has still been quite scared and emotional at various points throughout the day. The good part for him, though, is that he is getting spoiled like crazy, which means new toys, tons of hugs and snuggling, and you guessed it, sweets.

This morning when he woke up, I told him that I was going to bake him whatever he wanted. After pulling out his cookbooks and sitting on my lap while I peered through recipes online, he decided on some Oreo-like chocolate sandwich cookies. We filled them with bright orange vanilla cream, perfect for Halloween. I think I have been enjoying them even more than he has- they are just so good when dunked in a tall glass of soy milk.


Chocolate Sandwich Cookies with Vanilla-Cream Filling: from Retro Desserts

Ingredients:

For Cookie Dough:
1 1/4 cups all-purpose flour
1/2 cup unsweetened cocoa
1 teaspoon baking soda
1/4 teaspoon baking powder
1/4 teaspoon salt
1 1/2 cups sugar
10 tablespoons (1 1/4 sticks) unsalted butter at room temperature
1 large egg
For Vanilla-Cream Filling:
4 tablespoons (1/2 stick) unsalted butter at room temperature
1/4 cup vegetable shortening
2 cups powdered sugar
2 teaspoons vanilla extract

Directions:

Preheat oven to 375 degrees F. In a food processor or the bowl of an electric mixer, thoroughly mix together the flour, cocoa, baking soda, baking powder, salt and sugar. While pulsing or on low speed, add the butter, then the egg. Process or beat until the dough is thoroughly blended and massed together. Drop rounded teaspoons of batter onto nonstick or parchment-lined cookie sheets at 2-inch intervals. With moistened fingers, round out the cookies and flatten them a little. Bake for 9 minutes, turning the pans once for even baking, until the cookies are set. Set the cookie sheets on a rack to cool.

To make the filling: Put the butter and shortening in a mixing bowl and, at low speed, gradually beat in the confectioners' sugar and vanilla, until blended. Turn the mixer up to high and beat for 2 or 3 minutes more, until fluffy.

With a pastry bag fitted with a 1/2-inch tip, pipe teaspoon size blobs of filling onto the tops of half the cookies. Keeping the smooth bottoms of the cookies facing up, flip the remaining cookies on top of the filling and lightly press to form sandwiches.

Tuesday, October 28, 2008

WTF BROCCOLI PART DEUCE.

notfakebroc

A large number of our current readers are getting here via this post, which has been featured all over the internet in the last week and a half or so. A few days ago, I emailed the company- Small Planet Foods, and asked them if they'd like to comment on, or offer an interview about the tiny broccoli faces. I received, unsurprisingly, (they are owned by General Mills, after all) a pretty canned response:


"Dear Mrs. Carrier:

Thank you for contacting us concerning Cascadian Farm. We appreciate the opportunity to address this matter. Unfortunately, there is no one available for you to interview. However, I have included some information about the history behind the faces.
The tradition of hiding names or faces on Cascadian Farm packaging began over a dozen years ago. It was unspoken tribute by the package design department to the friends & family of Cascadian Farm. The faces won’t be included on our redesigned packaging.

If you have any further questions or concerns, please let us know.

Sincerely,

Leah Giovanni

Consumer Services"

So, that's about it. I'm pretty bummed to hear that they're phasing it out, but I'm not surprised. In fact, Summer and I recently took a field trip to the grocery store so I could pick up my own box of broccoli (Just to hang onto for fun. I'll save the box.) and we did some snooping to see what we could find.

One of the first things we noticed was that they were nearly sold out of the packaged broccoli containing the faces? Coincidence? WHO KNOWS.

wherezthebroc

I don't think I noted in the original post that the BOXED broccoli was the one with faces- the bags don't have it. In fact, we poked around all over the store, gazing at frozen vegetables, boxed cereal, juice concentrate- all from Cascadian Farm, and the only place we found more faces was the place we expected to. Reader Tim Bennett tipped us off in an email that the Cascadian Farm jam packages also had faces- and sure enough, there they were. MORE CREEPY-ASS BABIES, STARING US DOWN.

jam3

jam4

Further inspection showed DIFFERENT FACES hiding out in different flavors of jam, but we only ended up buying grape.

jam2

Jane Wells, of cnbc.com, insinuated here that Summer and I might have staged the whole thing, photoshopping tiny faces into the images ourselves. While that certainly wouldn't have been too difficult (well, maybe it would be, I'm no photoshop champ), I can assure you that I'm far too lazy to go to that much trouble for a laugh on my blog. All I can offer by way of proof is digital photographs, which I know don't hold much weight these days. Consider this very close-up shot of one of the creepy baby faces, which links to a high-res version on flickr that you can examine to your heart's delight:

jam

Anyway, I'd like to take this opportunity to once again say hello to our new readers, and hope that everyone sticks around for recipes and fun pictures. Speaking of pictures- on a technical note, I took these photographs with my Canon 20D, but since I don't have any fancy macro lenses, I simply stacked my two cheap lenses together to get the close-ups. It's a pretty easy trick and it takes very close-up images. That's where the weird vignetting comes from in some of the pictures, too- the lenses weren't taped together at all or anything, so you can sort of see the shadow of the other lens.


So, there you have it. An "unspoken tribute" (what is that even supposed to mean?) to friends and family of Cascadian Farm, as many commenters have already verified. And that's the last you'll hear from our frozen broccoli packages (I hope.)

Recipe for Mozzarella Stuffed Peppers


Stuffed peppers are a handy supper dish, but many of the 'traditional' versions (i.e. filled with minced meat and rice) are too heavy for me. Recently I've tried couple of lighter versions, and this one was well received at a recent dinner with friends. The recipe is adapted from an old issue of British Tesco Recipe Magazine (March 2003, I believe). The dish contains very few ingredients, but had surprisingly plenty of flavour, so I'll definitely try this again.

PS Sorry for the small hiatus - I was participating at a workshop in Finland, spending most of the last week in Tampere and Helsinki. It wasn't all work, however, as my dear K. joined me for the weekend of special shopping and delicious eating in Helsinki.

Mozzarella-stuffed Peppers
(Mozzarellaga täidetud paprikad)
Serves 3 as a main course or 6 as a starter


3 bell peppers (a red, yellow and orange one, perhaps?)
1 Tbsp olive oil
150 g fresh mozzarella cheese, cubed
8-12 cherry tomatoes, halved or quartered
half of a red onion, thinly sliced
a generous handful of fresh basil leaves
salt
freshly ground black pepper

Halve the peppers, remove the seeds. Brush the pepper halves with oil, both inside and out, and place snugly next to each other in an oven dish.
Divide mozzarella cubes, halved or quartered cherry tomatoes, onion slices and half of the basil leaves between the pepper halves.
Season with salt and pepper and drizzle with olive oil.
Bake in the middle of a 180 C/350 F for 30-40 minutes, until mozzarella has melted.
Sprinkle the rest of basil leaves on top, drizzle with some more olive oil and serve with a crusty bread.

Other stuffed peppers recipes @ Nami-Nami:
Red peppers with cumin-scented halloumi cubes
Pointed red peppers stuffed with spinach & mushrooms

Monday, October 27, 2008

spiced apple and pear crumble.


Yes, here I go again with another apple recipe, but hey, it's fall, right? Here in Portland the leaves have almost all changed to vibrant colors, the air is crisp and windy, and folks all over are dressed in sweaters and bright scarves. If that's not enough to inspire frequent traditional Autumn baking then I don't know what is.

I really do not have much to say about this recipe. It's simple, fragrant, and mighty tasty, just like any apple/pear dessert should be. Go ahead, eat it with friends using spoons right out of the baking dish, with fall foliage in view. Or share it in bed with your honey under a warm blanket, with vanilla bean ice cream piled on top. Or even cut the recipe down, make yourself a single serving, and enjoy some alone time out on the porch with a good book and a thick scarf. It's better that way.


Spiced Apple and Pear Crumble

Ingredients:

3 baking apples, peeled, cored and thinly sliced
3 ripe but firm red pears, peeled, cored and thinly sliced
1 tablespoon lemon juice
2 tablespoons granulated sugar
2 teaspoons ground cinnamon
1 teaspoon ground ginger
1/4 teaspoon grated nutmeg
3/4 cup all-purpose flour
3/4 cup rolled oats
1/2 cup brown sugar
1/4 teaspoon salt
1/2 cup (1 stick) cold butter, diced, plus more for buttering the dish

Directions:

Preheat oven to 350 degrees F. Toss apples and pears with lemon juice and granulated sugar in a large bowl. Stir in cinnamon, ginger, and nutmeg and toss well to combine. Spread fruit evenly in a buttered baking dish and set aside.

Combine flour, oats, brown sugar and salt in a food processor. Add butter to flour mixture, then pulse several times to incorporate butter into flour until mixture resembles coarse meal. Evenly spread the topping over the fruit, pressing down slightly with your fingers. Bake for 45 to 50 minutes or until fruit is tender, juices are bubbly and topping is crisp.

Friday, October 24, 2008

vegetarian chili.


As much as I have faith in myself as being a good baker, I have never prided myself on being the most amazing cook. People have frequently complimented my dinners, but if I didn't follow recipes exactly, I would be completely lost. I am not one to quickly throw amazing meals together with just a few ingredients and I am not very inventive when it comes to "real food" (as opposed to food that has a high percentage of sugar). That being said, there are two things I can generally always make well without a recipe: lasagna and chili. I think this is mainly due to the fact that I have made both of them more times than I can possibly count so I know the processes like the back of my hand.

Today was one of those days when the morning seemed to so quickly turn into the afternoon. Alice and I were meeting to discuss future plans for this site (food groups, side pages, features, ads, etc.) and time seemed to be passing by at a fast speed. Suddenly our stomachs were growling, but since the children were well-behaved and occupied, we wanted to continue to get our "work" done (I put work in parenthesis because some might argue using that term to discuss the process of blogging). So, I hurried through the kitchen and decided to throw together a pot of chili, something that generally only takes me a few minutes. It was done and on the table within thirty minutes, making our mouths happy and our bellies warm.

Please keep in mind, this is a very loose recipe. Chili is quite forgiving and can be made many different ways, so feel free to throw in whatever you would like (real meat, faux meat, sweet potatoes, carrots, peppers, grains, etc.)


Vegetarian Chili

Ingredients:

2 tablespoons olive oil
1/2 onion, diced
2 cloves garlic, minced
1 large can (28 ounces) crushed or diced tomatoes
2 cans (15 ounces each) of beans, drained - black, garbanzos, kidney, and/or pinto
1 can (15 ounces) corn, drained or 1 cup frozen or fresh
2-3 tablespoons chili powder
2 teaspoons ground cumin
1/2 teaspoon cayenne pepper (optional- depends on how spicy you like it)
1/2-1 teaspoon salt
1/4-1/2 teaspoon ground pepper
1-2 cups water or stock, depending on how liquidy/thick you like it

Directions:

Heat olive oil over medium-high in a large pot or saucepan. Add onions and garlic and saute until translucent, about 3 minutes. Add tomatoes, beans, and corn. Bring to a boil and add chili powder, cumin, cayenne pepper, if using, salt, and pepper, and water or stock. Stir well. Turn heat down and simmer for about 20 minutes.

Serve topped with your favorite chili toppings. My favorites are leeks or onions, grated cheese, sour cream, toasted pumpkin seeds, and, surprise, chocolate chips.

Thursday, October 23, 2008

donut muffins.


Alice: "Do you want to bake something and come meet us at the park?"
Me: "Sure. I can probably have something ready within a half hour."
Alice: "What would be good on this cold and blustery day?"
Me: "Warm muffins."
Alice: "Oh, yes. Something muffiny would be great."
Me: "Pumpkin? Apple? Banana-Nut?"
Alice: "Hmmm..."
Me: "Or I could make muffins that taste just like donuts with sugar on top."
Alice: "YES. THOSE."


I am quite sure that the idea of a muffin that doubles as a donut is an idea that appeals to almost everybody. Few people don't enjoy the special sweet taste that a donut has and the unarguable comfort of a warm homemade muffin. I was first introduced to this idea quite a few years ago. I was vegan back then and had a couple failed attempts at making my own, resulting in muffins that were terribly heavy and quite un-donutlike. It wasn't until today that I decided to try again, using a recipe from Molly of Orangette. And this time, as I was slathering the right-outta-the-oven warm muffins in butter and dipping them in powdered sugar, I knew, damn, these are going to be good.

donutmuffins

And so we sat on the steps of Piccolo Park, happily enjoying our donut muffins while trying to keep our sugar-loving kids from eating the entire batch. We were aware of the yearning looks of onlookers, mainly children, who wished that they too could be sporting the powdered sugar moustaches that we had so deliciously acquired.


Donut Muffins: adapted from Orangette

Ingredients:

For muffins:
3 cups unbleached all-purpose flour
2 1/2 teaspoons baking powder
1/2 teaspoon baking soda
1/2 teaspoon salt
3/4 teaspoon freshly ground nutmeg
3/4 cup plus 2 tablespoons whole milk
1 teaspoon white or apple cider vinegar
1 1/2 sticks (6 ounces) unsalted butter, at room temperature
3/4 cup plus 2 tablespoons granulated sugar
2 large eggs
For topping:
4 tablespoons unsalted butter
1 1/2-2 cups powdered sugar

Directions:

Preheat the oven to 350 degrees F. Spray a standard-size muffin tin with cooking spray.

In a medium bowl, combine the flour, baking powder, baking soda, salt, and nutmeg, and whisk to mix them thoroughly. Set aside.

Combine the milk and the vinegar in a measuring cup, and set aside.

Place the butter in the bowl of a stand mixer fitted with the paddle attachment (or, alternatively, in a large mixing bowl with electric beaters nearby), and beat on medium speed for a few seconds, until the butter is soft and creamy. With the motor running, add the sugar in a steady stream. Continue beating, scraping down the sides of the bowl once or twice, until the mixture increases in volume and lightens to pale yellow. Add the eggs one at a time, beating until they are just combined.

With a wooden spoon, mix 1/4 of the flour mixture into the butter mixture. Add 1/3 of the milk mixture. Continue to add the dry and wet ingredients alternately, ending with the dries. Mix until the dough is smooth and well combined, but do not overmix.

Divide the batter between the cups of the muffin tin. Bake until the muffins are firm to the touch and a toothpick inserted in the center comes out clean, about 25-32 minutes.

When the muffins are cool enough to handle, prepare the topping: melt the butter in the microwave or on the stovetop, and pour the powdered sugar into a deep bowl. Using a pastry brush and working one muffin at a time, lightly brush the entire outside of the muffin with butter, and then roll it in the powdered sugar. Shake off any excess, and place the finished muffins on a rack or serving platter. Serve.

butternut squash curry

butternutcurry

What do you do with all your leftover butternut after you're burnt out on holiday foods? Not everything has to contain nutmeg and brown sugar, right? After making soup from some tasty butternut squashes, we had a couple of already-roasted pieces leftover that didn't make it into the soup. (Remember, I said it's a to-taste soup!) I asked Jason what we could do with them and he mentioned throwing it into a curry dish. I initially balked at the idea- curry with butternut squash? But I trust his judgement and he did his thing. I imagined a pureed squash being stirred into the final product, but he simply cubed up the already-roasted squash and tossed it in. It melted into the curry but left big chunks, so the end result was a thick, creamy, sweet and mild curry that held up well to the sambal chili sauce we mixed in. I don't usually add chili sauce to things because I think it can overwhelm subtle flavors, but in this case it just perfectly highlighted the mildness of the squash in comparison to the warm spice of the curry.

How we did it:

1 can of coconut milk
Some red curry paste (we always use Thai Curry brand. We got fancy homemade curry paste from the farmer's market once, and aside from being a bit spicier, Jason and I agreed that it tasted just like the Thai Curry stuff.)
Assorted vegetables of your choosing, though you can't go wrong with carrot, broccoli, celery, onion, bell pepper, etc.
Some sort of protein- we use chicken thighs in our curry, the darker leg meat goes wonderful with the rich flavors. Tofu and tempeh would work wonderfully, of course, or mock duck if you can find it, that stuff is AMAZING.
Chopped garlic & onion
A large handful of cubed, roasted butternut squash. (This can be done well in advance. It will keep fine in your fridge for a day or two.)
Splash of soy sauce
Pinch of brown sugar
Splash of fish sauce (or vegan oyster sauce if you can find it, haha)


In a large pan, saute chopped garlic and onions for a minute or two, then add chicken or mock duck, then add the rest of your vegetables. Throw in a little bit of soy sauce and a teeny tiny splash of fish sauce (I use less than 1/4 tsp.) and let it simmer for a moment. Add about half a can of coconut milk, and begin stirring in curry paste 1 tablespoon at a time until you think it tastes good. Add butternut squash and stir well. Let simmer until vegetables are cooked to your preference (and make sure meat is fully cooked). Serve with jasmine rice. (We used brown basmati rice. Brown jasmine would be even more delicious, but it's hard to find.) Top with Sambal Oelek for a little spice.

Wednesday, October 22, 2008

spicy empanadas.

You might remember our sweet little peach empanadas from back in August. We've been talking about making savory ones for a long time and when Summer got the itch (wait, SUMMER wanted something that wasn't sweet?), I was happy to comply.

empanadas

Since I eat meat and Summer doesn't, we did 2 different fillings. We used this awesome pastry crust recipe that Summer jacked off a crisco container. Laugh all you want, but those package recipes have test kitchens full of professional chefs and the recipes are always bomb. Tollhouse cookies anyone? I rest my case.

empanadas2

Adapted Crisco recipe for the crusts:

2 cups all-purpose flour
1 tsp. sugar (we lowered the amount since we weren't looking for sweet. Original recipe calls for 2 tbsp.)
1 tsp. salt (we decided it could have used more salt, to go with what we stuffed them with.)
3/4 cup shortening (we prefer organic)
5 tbsp. cold water

Combine flour, sugar, & salt in medium bowl. Cut in shortening using 2 knives (or a pastry cutter) until all flour is blended to form pea-sized chunks. (I imagine you could use a food processor for this purpose, also.) Sprinkle 5 tbsp. water, one tbsp. at a time. Toss lightly with a fork until dough forms. Flour rolling surface and pin lightly. Divide dough in half. Roll each half to 1/16th" thickness. Use lid from 3 lb crisco can (or a tub of butter, or a quart tub of yogurt, whatever) as a pattern. Cut 6 circles from each half. Spoon in a small amount of filling (Don't over-stuff! You'll have to live and learn on this, unfortunately.) and moisten edges with water. Fold in half and press with fork to seal. Poke air holes so they don't explode. Bonus points for a cute pattern. Bake 20 minutes at 425ºf and let cool on a rack for 10 minutes before eating. (It's hard to wait. I know.)

empanadas4

The fillings were simple. I threw together a large bowl of fresh salsa (tomato, onion, cilantro, lime juice, pinch of salt) and for the vegetarian filling, we just heated up some black beans, seasoned them with a little bit of cumin, chili powder, and garlic powder, and added a handful of frozen corn. For the meat ones, I cooked up some chorizo sausage that I bought in bulk at the grocery store. It was delicious and spicy! To fill the empanadas, we layered grated manchego (one of my favorite cheeses), small scoops of the filling, and a dollop of the salsa. Summer snuck tapatio into her vegetarian ones for a little extra kick.

empanadas5

These were tasty but the only amendment I'd make to the recipe would be to brush the tops with an egg wash and sprinkle with coarse salt. The flaky pastry crust was delicious, but a little bland in comparison to the spicy chorizo and melted cheese. Needs more salt!

The best part of making these was loading them up into a little basket and walking them over to my husband's shop, a few blocks away from Summer's house. We cruise over there for coffee fairly often and I get to say hello to him a lot, which is a nice treat. We sat on the sidewalk and had a miniature picnic, gobbling down our lunch and watching our boys chase each other. It was fun to bring him something for lunch, I'm sure he appreciated the snack.

Hello!

HELLO

All right, all right- I know this is absolutely RIDICULOUS, but I think it says a lot about the partnership between me & Summer that when I mentioned taking a photo like this, for a post like this, rather than rolling back in her head- her eyes lit up like a Christmas tree and she exclaimed, "I was thinking the exact same thing!" We just wanted to say hello to all the new readers who have been popping in. Thanks to this post, we've been getting a crazy amount of traffic! We're really pleased to see new readers and we have a lot of awesome stuff planned in the coming months, so keep watching.

Monday, October 20, 2008

butternut squash soup.

butternut

It's here! You asked for it! My very simple butternut squash soup recipe. If you're like me, and your first, mildly traumatic experiences with butternut squash soup involved the cartons of pre-made, overly sweet crap you can buy at places like Trader Joe's (not hatin' though, I still love TJ's.) you might not like the idea of butternut squash soup. I know I never did.

The other day at work, a man who comes in often with his preteen son (who is an adorable, stern young man, who always says please and thank you) thanked me for the hot chocolates I made for them, and said, "You have a secret ingredient, don't you?" I acknowledged that we put a little something extra in, and he quickly stopped me and said, "Don't tell me! I don't want to know." (It's just vanilla, dude!) The idea of a "secret ingredient" is kind of silly to me, but I understand the appeal. Something subtle that people notice, but not overwhelming enough that it's all you taste. So what's the secret ingredient here?

butternut2

Nothing fancy. Just roasted poblano peppers. Don't let me take all the credit, though- this recipe is all Jason. (Of course.) It adds a smoky, spicy finish to a sweet, rich soup. The preparation is simple, but it can quickly become overwhelmingly messy, so keep tabs on your kitchen or else you'll end up with a disaster like I did tonight, ha!

This is sort of a 'to-taste' recipe- like most of our soup recipes, but I'll try to be as exact as possible. For this batch, here's what I did:

2 butternut squashes
1 poblano pepper (you can adjust the spice level by adding more or less roasted pepper, but generally speaking, poblanos are rather mild.)
1/2 a white onion
1 small white shallot
1 whole head of garlic
3 very skinny carrots (or one or two larger ones)
3-4 cups of vegetable or chicken stock. (In this case I used a vegetable stock that I made before our vacation using a large number of carrots, hoping the carrots would add to the sweetness of the soup. I think I was right.)

Preheat your oven to 375ºf.

Slice squashes lengthwise, so you can scoop out the seeds. You can cut them down a little more if you'd like, to fit on your pans and maybe cook a little faster. Drizzle with olive oil, salt lightly, and place on a baking sheet in the oven.
You know what? Do i need to describe the whole process? Everything gets drizzled in olive oil and roasted at the same time in the oven. I wrap the onions, shallot, and garlic individually in tinfoil, and leave the seeded, halved pepper on a baking sheet, along with the carrots. Keep an eye on the pepper and remove when it becomes blistery and begins to blacken.

Just peek in on everything every once in awhile and make sure nothing's burning. Pull things out as they finish (The peppers will finish first, then the carrots, then the shallot probably, then the garlic, then onion, then butternuts, probably.) Just keep poking everything until it's mushy. Let everything cool so you can handle it easily, and heat up your stock while you wait.

Bust out your blender or food processor, and put a large pot aside for the finished soup. Begin blending the ingredients (duh, don't forget to peel your butternut) in steps, adding warm stock as needed to get it smooth. Dump it all in the big pot and stir it up really well, adding more stock if necessary to thin to desired consistency. Put over heat if necessary- letting all the ingredients cool can leave you with a lukewarm soup. Serves 3-4.

toasted

Last night I happened to carve a pumpkin and I cleaned and toasted the seeds. I tossed a handful on my dinner salad and garnished my soup with them, too. All I did was wash them, let them dry overnight on a brown paper bag, and then coat them with olive oil & salt, and then toasted them for 10-15 minutes at 375º.

butternut3

I can't help it, guys. It's fall! It rained half the day today, and then it got a little bit sunny. I went jogging this morning in the rain and I saw the sun painting the leaves of the trees bright gold, contrasted against a grey sky with a RAINBOW IN IT. It's beautiful out here! I'm going to drink some chamomile tea, and tomorrow afternoon I'm going to heat up the rest of my soup and eat it with a grilled cheese sandwich.

baked acorn squash rings.


I fully admit that I have never been a fan of squash. The idea of it, especially since it is generally such a beautiful family of vegetables, has always appealed to me, but I have always been disappointed by the taste and texture (other than butternut squash soup, which just happens to be our next post). This isn't to say that I hadn't been open-minded to continuing to try it in different ways. With squash season fully upon us, I decided to start buying them to experiment with. The first one was a massive pink banana squash that I chopped up (with our rather dull kitchen knives, resulting in some wretched hand pain) and put into our crock pot with apples, spices, and sugar. Yet again, I was not impressed. That was until today.

While Alice was still at our house this afternoon after photographing the apple tart, I thought it would be fun to throw something quick together, mainly for another photo opportunity. I wanted to keep with harvest theme so I grabbed an acorn squash off our porch that was mixed in with our hand-picked pumpkins and started slicing it up into rings, an idea that came from the classic Martha Stewart Cookbook. I then followed the rest of the directions and chatted while they baked and I waited for the results. And you know what? I have discovered a brand new love of squash. This was more scrumptious than I can describe, the kind of food that has you shoveling forkful after forkful in your mouth with mutterings in-between of "Oh my God". Further proof of how good it tasted was that we had quite a few adorable little rings and flower-shaped pieces of squash meant to be photographed, but they were too quickly engulfed by Alice to make it to the camera. It is simplicity at its finest with only a small handful ingredients, but filled with so much flavor.


Baked Acorn Squash Rings: from The Martha Stewart Cookbook

Ingredients:

1 small acorn squash
4 tablespoons (1/2 stick) unsalted butter, cut into pieces
Coarse kosher salt and freshly ground black pepper
1/3 cup packed dark brown sugar

Directions:

Preheat oven to 350 degrees F.

Cut the unpeeled squash crosswise into 1/2-inch slices and place them on a cutting board. Using a biscuit cutter or cookie cutter slightly larger than the seed center, cut out the seeds from each ring and discard.

Place the squash rings on a lightly buttered baking sheet. Dot each ring with butter and season to taste. Sprinkle a bit of brown sugar over each ring.

Bake the squash for 15 minutes. Turn the rings over, dot with more butter and sugar, and bake until tender, 5 to 10 minutes longer. Serve hot.

quick french apple tart.


On Saturday morning, after making our weekly stop at the downtown market, my family and I headed out to one of my favorite annual events: the Apple Tasting Festival at Portland Nursery. The festival is free and consists of pumpkin painting tables, cheap apple foods (mmm, warm apple streudel with soft serve vanilla ice cream), inexpensive fresh produce, and a huge tented area with over sixty varieties of apples (and some pears) to try. What always seems to amaze me is just how different each apple tastes, varying from one another in different levels of sweetness, tartness, crispness, boldness of flavor, and juiciness. With a list of my favorites in hand, we headed off to the fruit bushels where I filled three huge bags with a combination of Gourmet Goldens, Rome Beauties, Mutsus, and Liberties.

Today I figured it was time to start on putting these baking apples to good use. I had an unopened package of puff pastry in the freezer, so I decided to go for a simple apple tart, easily made with one sheet of the pastry, thinly sliced apples, and a bit of butter and sugar. The recipe itself hails from a beautiful cookbook I recently received as a gift called Eat Drink Live by Fran Warde. It is filled with 150 colorful pages of simple, delicious-sounding recipes that I can't wait to try out.

Anyways, enjoy this scrumptious, buttery tart that is a wonderful Autumn treat. (Oh, and isn't that photograph Alice took of the slice of tart in our burning bush freaking adorable?)


Quick French Apple Tart: from Eat Drink Live

Ingredients:

8 ounces ready-made puff pastry, thawed
1 egg, beaten
3-4 red apples
2 tablespoons butter, melted
2 tablespoons brown sugar
1/2 teaspoon ground cinnamon

Directions:

Preheat oven to 400 degrees F. Lightly butter a baking tray.

Roll out pastry to a rectangle 12 x 7 inches. Put on the baking tray and brush all over with the egg.

Cut the apples into quarters, removing the cores. Slice thinly and arrange in rows on top of the pastry, leaving a 2-inch gap around the edges. Drizzle the melted butter over the apples, sprinkle with sugar, and dust with cinnamon. Brush the edges of the pastry with the remaining egg wash, then fold inwards and gently press down.

Bake the tart in the oven for about 30 minutes. Reduce the temperature to 350 degrees and bake for another 15 minutes, until the tart is well risen, crisp, and golden all over.

Serve hot or at room temperature with whipped heavy cream, clotted cream, scoops of good-quality vanilla ice cream, or homemade custard.

WTF, BROCCOLI? (UPDATED)

Edited to add:
An update to this post can be found here.


Okay, I know this isn't a recipe, but it's food related, and it's too funny to not share.

Now that we're settled in from our respective vacations, and enjoying the fall weather- Summer and I are getting back down to business. I was over at her place this morning photographing some tasty treats that will hopefully show up here later today, and she suddenly remembered this crazy broccoli package in her freezer she wanted to show me. She handed me the box and I studied it carefully, squinting, even allowing my eyes to blur, to try and see what I was missing. She pointed- "Do you see?" See what? I didn't see anything. Just broccoli. Her finger tapped on a certain part of the box and she urged me to look closer. "There- right there. Do you see it? I'm not going to tell you what it is if you don't see it." And then, it suddenly became clear to me. WHAT THE HELL?

It shouldn't be too hard to see here:

WTFBROCCOLI2

But if you're still not quite getting it, perhaps these macro shots will help:

WTFBROCCOLI3

WTFBROCCOLI

LITTLE TERRIFYING ECSTATIC FACES, HIDING IN THE TEENY TINY BROCCOLI BITS.

Uh, okay guys. Lay off the reefer, all right? We honestly can't imagine why they'd sneak this in- other than for laughs, but it's pretty darn funny. In case you're wondering, the brand was Cascadian Farm frozen broccoli. But, I shouldn't be surprised- we all know those Cascadians are wacky!

Oven-baked potato wedges with caraway seeds


I love caraway seeds, that's not a secret. There have been roasted beets with caraway seeds, shaken cucumber salad with caraway seeds, creamy beetroot soup with horseradish and caraway seeds, caraway-infused sauerkraut braised in beer, easy cheese crisps with caraway seeds - to name just a few. And one of my old favourites that has recently enjoyed a comeback, is a 'recipe' for oven-baked chips with caraway seeds.

So here's what you need to do.

Take your favourite roasting potato (I use a local variety, Laura, which has a thin pink skin and dark yellow flesh - Estonians like their potatoes to be yellow, not white inside), scrub very clean and cut lengthwise into wedges (four is plenty). Place into an oven tray, preferably large enough to snugly fit the potatoes in one layer. Drizzle generously with oil (and give them a good stir, so they'd be covered with oil), season with sea salt and caraway seeds.

Bake for 35-45 minutes (the timing really depends on the size and variety of your chosen potato) at 200 C/400 F, until the potato wedges are soft inside and crisp & brown outside and a lovely smell of caraway seeds has filled your kitchen. Sprinkle with some extra sea salt, if necessary.

Serve as a side dish with some meat, or simply dip them into some nice sour cream. Mmmmmm....

Ahjukartulid köömnetega

honey yeast rolls.


On Thursday morning, I woke up with a sudden urge to make bread. Having a day ahead of me with nothing planned and a new bag of bread flour, I searched through my saved yeast bread recipes and quickly chose one from A cookie a day for gorgeous-looking honey rolls. What I wasn't aware of until later that evening was that I had woken up with this bread-making urge on what is known as World Bread Day- a fine coincidence, I must say.

And so, on the evening of a day dedicated to the staff of life, we enjoyed these delicious rolls that were a perfect compliment to our hearty dinner of mashed potatoes, gravy, veggie roast, and roasted vegetables. They tasted sweet and were quite soft, much like challah, with a lip-smacking buttery crust. So, if you have the time (and especially if you have an electric mixer with a bread hook, like I do), I urge you to try this recipe out for yourself, even if just for the intoxicating smell of baking bread that will fill your home.


Tender Honey Yeast Rolls: from A cookie a day

Ingredients:

4 cups bread flour (Start with 3)
1 cup warm water (105° to 115°F)
1/4 cup honey
3 tablespoons canola oil
1 1/4 teaspoons salt
1 egg, lightly beaten
1 package dry yeast (1/4-ounce)
Vegetable cooking spray

Directions:

In a large bowl, dissolve the yeast in the warm water and let stand until foamy, about 5 minutes. Using a wooden spoon, stir in the honey, egg and oil. Add roughly 3 cups of the flour and the salt until the dough comes together in a sticky mass. Turn the dough out onto a lightly floured surface and knead, working in the remaining flour as necessary to keep the dough from being too sticky, until the dough is smooth and elastic, 8 minutes. Do not be tempted to add too much flour. The dough should stay soft and will become less sticky with kneading. Form the dough into a ball and transfer it to a lightly oiled bowl. Cover the bowl with a damp kitchen towel and let the dough rise in a warm, draft-free spot until it doubles in bulk, about 2 hours.

Turn dough out onto a lightly floured surface, and knead 30 seconds. Cover dough, and let rest 10 minutes. Punch dough down, and divide into 12-18 equal portions. Shape each portion into a ball, and place on baking sheets coated with cooking spray. Cover and let rise in a warm place (85°), free from drafts, 20 minutes. Uncover and bake at 400 degrees for 13-15 minutes or until browned. About 5 minutes into baking, top rolls with 1 tablespoon of melted butter mixed with 1 tablespoon of honey. Remove rolls from pans, and serve warm or at room temperature.